
CRE-130 · Lesson 4 of 12 · 25 min
Light at home and indoors
Light is the single biggest factor in how professional phone content looks. Because phone sensors are small, they need plenty of light to produce clean, sharp, natural images; in dim rooms, even the best phone produces noise, smearing and flat colour, and the camera may slow its shutter speed so much that movement blurs. Good light also shapes the subject, revealing texture and form, setting a mood and drawing attention to what matters. The good news is that excellent light is available in most homes for free, through windows, and inexpensive lights can supplement it. This lesson covers the qualities of light, using window light, controlling contrast with reflectors and diffusion, colour temperature and mixed light, choosing and placing LED panels and ring lights, three-point lighting for talking heads, and practical setups for small spaces.
The qualities of light
Photographers describe light by several qualities:
- Intensity: how bright it is. More light allows lower ISO, less noise and faster shutter speeds.
- Direction: where it comes from relative to the subject and camera. Front light flattens; side light reveals texture and shape; back light outlines subjects and can create glow or silhouettes.
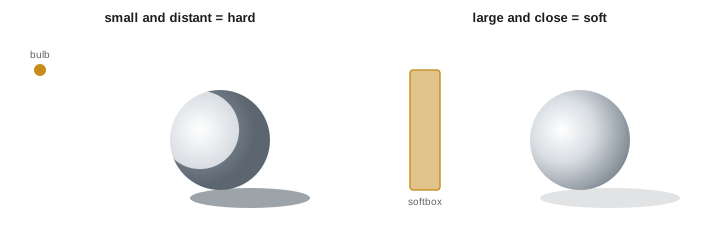
- Hardness or softness: hard light from a small or distant source, such as direct sun or a bare bulb, creates sharp, dark shadows; soft light from a large source close to the subject, such as a window with sheer curtains or an overcast sky, wraps around the subject with gentle shadow edges.
- Colour: the colour temperature of the light, from warm candlelight and tungsten bulbs to cool daylight and shade, discussed below.
The single most useful rule is that the size of a light source relative to the subject determines softness: the larger and closer the source, the softer the light. A window is a large soft source for someone sitting a metre away, and much harder for someone on the other side of the room.
Window light
A window is the best free light source for phone content. Indirect daylight, from a window that does not receive direct sun, is soft, bright and flattering. North-facing windows in the northern hemisphere receive indirect light most of the day; east-facing windows receive direct sun in the morning and soft light in the afternoon; west-facing windows the opposite. When direct sun comes through a window, it creates hard light with strong shadows and bright patches, which can be beautiful for dramatic images but usually needs softening for talking heads and products. Hanging a sheer white curtain, shower curtain or diffusion fabric over the window turns direct sun into soft light.
Where you place the subject relative to the window changes the look:
- Facing the window, with the phone between the subject and the window: even, flattering light with few shadows, ideal for beauty, makeup and talking-head content. Be careful not to block the light with your own body or the tripod.
- Window to one side: light on one side of the face and shadow on the other, adding shape and mood. A reflector on the shadow side softens the contrast.
- Window behind the subject: the subject becomes a silhouette or the window overexposes. This is usually the worst arrangement for talking heads, although backlight can create attractive rim light on hair and translucent subjects such as drinks and leaves when combined with fill light from the front.
Distance matters too. Light falls off rapidly as you move away from a window, so placing the subject close, about one to two metres away, gives brighter, softer light and a darker background, which helps separate the subject.
Reflectors and flags
A reflector bounces light back into shadows, reducing contrast. Collapsible photographic reflectors with white, silver and gold surfaces are inexpensive, but a sheet of white foam board, a large piece of white card, a white wall or even a white bedsheet works well. White gives soft, natural fill; silver gives brighter, harder fill; gold warms the light, which can look unnatural if overused. Place the reflector on the side opposite the window, close to the subject but out of frame, and move it nearer or farther to control the amount of fill. Small reflectors are especially useful for food and product photography, filling shadows in the front of a dish lit from behind.
A flag does the opposite: it blocks light to deepen shadows, add contrast or stop light spilling where it is not wanted. A sheet of black card or foam board, a dark towel or a piece of black fabric works as a flag. Flags are useful when a white room bounces so much light that images look flat, or to reduce light on a background so that the subject stands out.
Worked problem
Window light for a talking-head video
A creator films tutorials sitting at a desk with a large window on their left. The left side of their face is bright, the right side is dark, and the background wall is brightly lit. How can the lighting be improved without buying lights?
Show solution
- Keep the window to the side for shape, but turn slightly toward it so more light reaches the face.
- Place a white foam board or reflector to the right of the face, just out of frame, to fill the shadow side.
- Move the desk farther from the background wall, or hang a dark cloth on the wall, so the background is darker than the face.
- Lock exposure on the face so that the phone does not brighten or darken during recording.
Answer: Turn slightly toward the window, add a white reflector on the shadow side, darken or distance the background and lock exposure on the face.
Colour temperature
Light sources differ in colour, measured as colour temperature in kelvin (K). Lower values are warmer, more orange; higher values are cooler, more blue:
| Light source | Approximate colour temperature |
|---|---|
| Candle flame | 1,800–2,000 K |
| Household warm white LED or incandescent bulb | 2,700–3,000 K |
| Neutral white LED or fluorescent | 3,500–4,500 K |
| Midday sun | About 5,500 K |
| Overcast sky | 6,500–7,500 K |
| Open shade on a clear day | 8,000–10,000 K |
The phone's automatic white balance tries to make the light appear neutral, but it can only correct for one colour at a time. Mixed light, such as daylight from a window combined with warm ceiling bulbs, produces images in which one part looks blue and another orange, and skin tones may look patchy. Solutions include turning off the room lights and using only the window; replacing household bulbs with daylight-balanced bulbs of about 5,000 to 5,600 K when you want them to blend with window light; or using bi-colour LED lights set to match the dominant source. Deliberately mixing warm practical lamps in the background with cooler key light on the subject can look attractive, a common look in interviews and cosy videos, as long as the subject's skin is lit by one consistent source.
Colour quality: CRI and TLCI
Not all white light renders colours equally well. Inexpensive LEDs may produce light with gaps in their spectrum, making skin look grey or green, and product colours inaccurate. The colour rendering index (CRI), on a scale to 100, and the television lighting consistency index (TLCI), designed for cameras, measure how faithfully a light reproduces colours compared with a reference source. For content creation, look for lights with a CRI or TLCI of 95 or higher. Many household bulbs have a CRI of around 80, adequate for general lighting but noticeably poorer on camera. When products must be shown in accurate colours, such as clothing, cosmetics or art, high-quality light matters as much as the camera.
LED panels, softboxes and ring lights
When windows are not enough, or when you film at night, artificial lights provide consistent, controllable illumination. Options for phone creators include:
- Small LED panels: battery-powered, often bi-colour with adjustable brightness and colour temperature. They are portable and useful for fill light, but their small size gives fairly hard light unless diffused or bounced.
- Larger LED panels and lights with softboxes: a softbox or lantern attached to a light turns it into a large soft source, the closest equivalent to a window. Lights with Bowens mounts accept a wide range of modifiers.
- Ring lights: circular lights that surround the camera, producing even, shadowless front light and a distinctive circular reflection in the eyes. They are popular for makeup, beauty and talking-head content, but the flat look can lack depth, and the catchlights are recognizable. Larger ring lights give softer light.
- RGB lights: produce any colour, useful for coloured background accents, gaming setups and creative effects.
- Practical lights: lamps, fairy lights and neon signs visible in the frame, adding atmosphere and depth to the background.
Whatever the light, softness comes from size and distance. Bouncing a light off a white wall or ceiling turns a small light into a large soft source, though it reduces brightness and spreads light more widely. Diffusion material in front of a light also softens it.
Three-point lighting
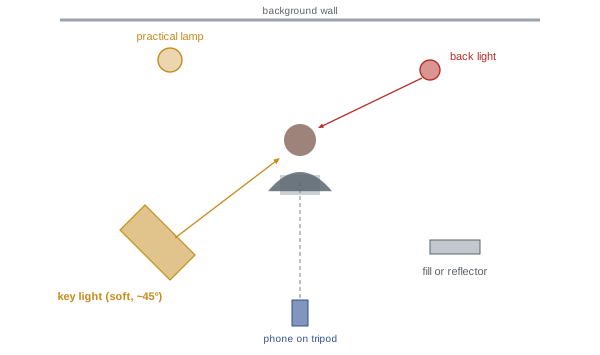
Three-point lighting is a classic arrangement for interviews and talking heads that works at any budget:
- Key light: the main light, placed about 30 to 45 degrees to one side of the camera and slightly above eye level, angled down toward the face. A window can serve as the key.
- Fill light: a softer, dimmer light or reflector on the other side, filling shadows to the desired degree. The ratio between key and fill controls mood: a small difference for a bright, open look; a larger difference for drama.
- Back light or rim light: a light behind the subject, on the side opposite the key, aimed at the head and shoulders to separate the subject from the background with a thin outline of light.
A fourth light on the background, such as a lamp, an RGB accent or a soft wash, adds depth. Not every setup needs all of these; many attractive talking-head videos use a single large soft key from one side, a reflector and a practical lamp in the background.
Avoiding common indoor lighting problems
Several problems recur in indoor phone content. Overhead ceiling lights create unflattering shadows under the eyes, nose and chin; turn them off and use side or front light instead. Light that is too low, such as a ring light placed below the face, creates an eerie look; raise lights slightly above eye level. Reflections in glasses can be reduced by raising the light, moving it farther to the side or tilting the glasses slightly downward. Shiny skin under strong light can be reduced with soft light and blotting paper or powder. Flicker, horizontal bands that roll through video, comes from some LED and fluorescent lights; Lesson 7 explains how to avoid it with shutter speeds of 1/60 or 1/120 s in North America, and better-quality flicker-free lights solve it altogether.
Lighting in small spaces
Many creators work in small apartments, bedrooms or shared spaces. Useful strategies include positioning the setup next to the largest window; using compact LED panels on light stands or clamps instead of large softboxes; bouncing light off white walls and ceilings; using collapsible softboxes and lanterns that store flat; choosing a background corner that can be dressed simply and quickly; and taping marks on the floor for the position of the chair, tripod and lights so that the setup can be rebuilt consistently each time. Consistency matters for series content: viewers notice when the look of a recurring video changes from episode to episode, so photographing or noting your lighting setup helps you reproduce it.
Common mistakes
MistakeSitting with a bright window behind you.
InsteadFace the window or place it to the side.
MistakeUsing overhead room lights as the key.
InsteadTurn them off and use side or front light.
MistakeMixing daylight and warm bulbs on the face.
InsteadUse one consistent colour of light on the subject.
MistakeBuying lights without checking CRI.
InsteadChoose CRI or TLCI of 95 or more.
MistakeUsing a small light close to the lens without diffusion.
InsteadDiffuse or bounce it for soft light.
Summary and key terms
- Phones need plenty of light; good light shapes subjects and sets mood.
- Larger, closer sources give softer light.
- Window light is free and flattering; placement changes the look.
- Reflectors fill shadows; flags block light and add contrast.
- Match colour temperatures and avoid mixed light on skin.
- High-CRI LEDs, softboxes and ring lights supplement daylight.
- Three-point lighting separates the subject and controls mood.
- Hard light
- Light from a small source with sharp shadows.
- Soft light
- Light from a large source with gentle shadows.
- Reflector
- Surface that bounces light into shadows.
- Flag
- Dark material that blocks light.
- Colour temperature
- Warmth or coolness of light in kelvin.
- Mixed light
- Sources of different colour temperatures in one scene.
- CRI
- Colour rendering index, measuring colour accuracy.
- Key light
- The main light on a subject.
- Fill light
- Light that softens shadows from the key.
- Back light
- Light behind a subject that separates it from the background.
Practice problems
Work each problem on paper first, then reveal the answer to check.
What determines whether light is hard or soft?
Show answer
The relative size of the source.
Which window position gives the most even light on a face?
Show answer
Facing the window.
What does a white reflector do?
Show answer
Bounces soft light into shadows.
What is a flag?
Show answer
Dark material that blocks light.
Colour temperature of a warm household bulb?
Show answer
About 2,700–3,000 K.
How can you fix mixed light?
Show answer
Turn off room lights, use daylight bulbs or match bi-colour lights.
Minimum CRI to look for in creator lights?
Show answer
95.
What is the main drawback of ring lights?
Show answer
Flat light and distinctive circular catchlights.
Where is the key light usually placed?
Show answer
30–45 degrees to one side and slightly above eye level.
Why avoid overhead ceiling lights on faces?
Show answer
They cast shadows under eyes, nose and chin.
Lesson quiz · 5 questions
Score 60% or more to complete this lesson.
Create a free account to save your progress, take quizzes and earn a certificate.