
PHOT-330 · Lesson 7 of 12 · 29 min
Night sky and astrophotography
The night sky is one of the most striking subjects in nature photography: the Milky Way rising over a mountain lake, star trails circling the pole above a lone tree, the aurora rippling green and violet across the northern sky. Modern sensors make these images possible with ordinary camera gear, but they demand careful planning, dark skies and specific technique. This lesson covers dark skies and light pollution, planning around the moon and the Milky Way, exposure rules for pinpoint stars, star trails, photographing the aurora, focusing in the dark and the conservation of dark skies. Wide-field landscape astrophotography is the focus; deep-sky imaging through telescopes is a separate specialty.
Dark skies and light pollution
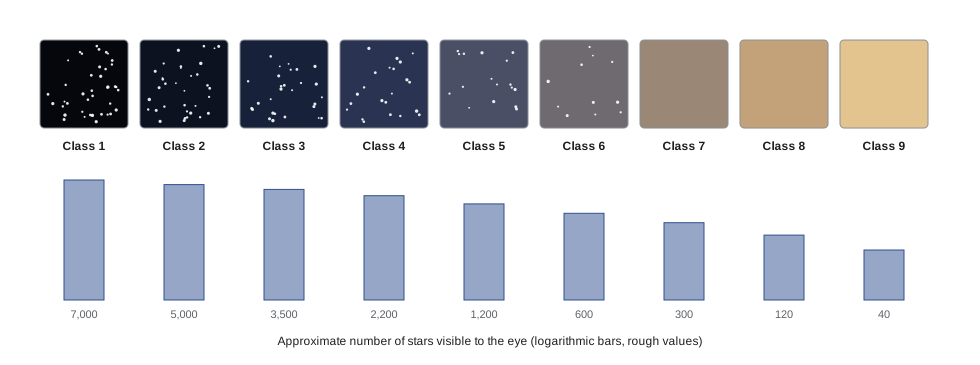
Artificial light scattered in the atmosphere brightens the night sky and hides faint stars and the Milky Way. In much of southern Canada and most of the United States, the Milky Way is invisible from cities and towns, and many people have never seen it. The Bortle scale, devised by amateur astronomer John Bortle, rates sky darkness from class 1, an excellent dark site, to class 9, an inner-city sky. Satellite-based light pollution maps give similar ratings and help find dark sites.
| Bortle class | Description | What you can see |
|---|---|---|
| 1 | Excellent dark site | Milky Way casts shadows; zodiacal light obvious |
| 2 to 3 | Typical truly dark or rural site | Milky Way highly structured; many faint stars |
| 4 | Rural to suburban transition | Milky Way visible but less detailed; light domes on horizon |
| 5 to 6 | Suburban | Milky Way faint or only overhead |
| 7 to 9 | Urban to inner city | Milky Way invisible; only bright stars and planets |
Light domes, the glow over towns on the horizon, can still spoil an otherwise dark site, so plan compositions facing away from them. Even small amounts of nearby lighting, such as a parking lot or cabin, can dominate long exposures.
Dark-sky places
Canada has a strong network of protected dark skies. The Royal Astronomical Society of Canada (RASC) runs a dark-sky sites program that designates Dark-Sky Preserves, Urban Star Parks and Nocturnal Preserves, with around two dozen preserves, including national parks such as Jasper, Wood Buffalo, Point Pelee, Kejimkujik, Grasslands and Elk Island. Wood Buffalo National Park is among the largest dark-sky preserves in the world. The Mont-Mégantic area in Quebec is an International Dark Sky Reserve recognized by DarkSky International, the organization formerly called the International Dark-Sky Association. Many Parks Canada sites run dark-sky festivals and limit outdoor lighting.
Dark-sky places are protected for wildlife and people as well as for astronomers: artificial light at night disrupts migrating birds, nesting sea turtles, insects and other nocturnal animals. Follow site rules on lighting, use red lights, and keep headlamps pointed down.
Planning around the moon and the Milky Way
The moon is the brightest object in the night sky after the sun and can wash out the Milky Way. For Milky Way images, plan around the new moon, or for times when the moon is below the horizon. For star-filled landscapes with detail in the foreground, a thin crescent or a moon low on the horizon can light the land gently. A full moon makes the landscape look almost like daylight on long exposures, which can be beautiful but hides fainter stars.
The bright core of the Milky Way, near the constellations Sagittarius and Scorpius, is best seen from the Northern Hemisphere between about March and October. In spring it rises in the southeast before dawn; in summer it is visible in the south through much of the night; by autumn it sets in the southwest in the evening. At high latitudes the core stays low in the south, and in midsummer the sky never gets dark enough for good Milky Way images because of the twilight discussed in Lesson 2. Astronomical twilight ends when the sun is 18 degrees below the horizon; at latitudes above about 48.5 degrees north, the sun does not reach that depth around the June solstice, so the sky never gets fully dark for weeks. Northern photographers therefore often concentrate on the aurora and star trails in autumn and winter.
Planning apps can show the position of the Milky Way core over a chosen foreground at any time and date, so you can line up an arch over a mountain or a vertical band above a tree.
Exposure rules for pinpoint stars
Earth rotates, so stars appear to move across the sky at about 15 degrees per hour, or 15 arcseconds per second, near the celestial equator, and more slowly near the celestial poles. With a fixed tripod, long exposures turn stars into short streaks. Photographers use simple rules to estimate the longest exposure before streaking becomes visible.
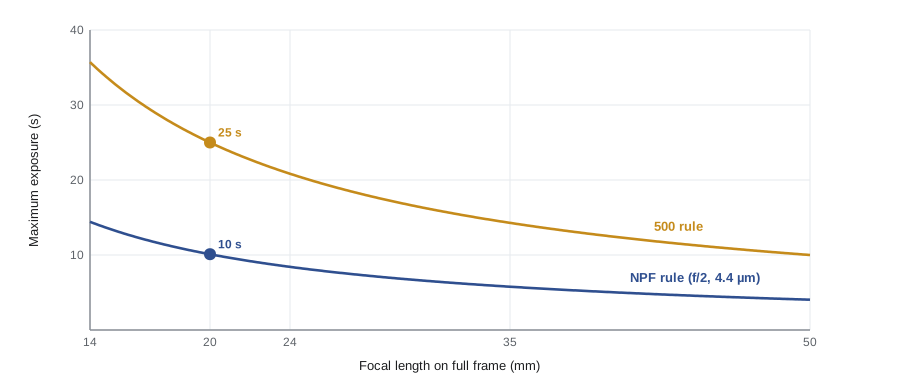
The traditional 500 rule says that the maximum exposure in seconds is about 500 divided by the full-frame-equivalent focal length:
This rule was developed in the film era and is too generous for modern high-resolution sensors, where trailing becomes visible at the pixel level sooner. The NPF rule, developed for the Société astronomique de France, accounts for aperture and pixel pitch. A widely used simplified version is:
where \( N \) is the f-number, \( p \) the pixel pitch in micrometres and \( f \) the focal length in millimetres. It gives the maximum exposure for stars that look like points at full resolution near the celestial equator; near the pole, longer exposures are possible.
Worked problem
500 rule against the NPF rule
A photographer uses a 20 mm f/1.8 lens at f/2 on a full-frame 45-megapixel camera (pixel pitch about 4.4 µm). Compare the maximum exposures from the two rules.
Show solution
- 500 rule: \( 500 / 20 = 25 \) s.
- NPF rule: \( (35 \times 2 + 30 \times 4.4) / 20 = (70 + 132) / 20 = 202 / 20 ≈ 10.1 \) s.
- The NPF limit is less than half the 500-rule limit.
Answer: About 25 s by the 500 rule but only about 10 s by the NPF rule. On a high-resolution sensor, 25 s will show visible star trailing at full size; 10 s keeps stars nearly round. For web use, an exposure between the two may be acceptable.
Settings for the Milky Way
Because exposure time is limited, Milky Way photographers gather light with wide apertures and high ISO. Typical starting settings on full frame are a fast wide lens at f/1.4 to f/2.8, an exposure set by the NPF rule (often 8 to 20 s), and ISO 1,600 to 6,400. Shoot RAW, set white balance manually to around 3,800 to 4,500 K for a natural sky, and turn off long-exposure noise reduction during sequences, so frames are not delayed, using separate dark frames later if needed.
Worked problem
Gathering enough light
A test frame at f/2.8, ISO 3,200 and 15 s gives a good exposure. The photographer switches to a faster lens at f/1.8 with the same exposure time. What ISO gives the same brightness?
Show solution
- Light gathered scales with \( 1/N^2 \).
- Ratio: \( (2.8 / 1.8)^2 = (1.556)^2 ≈ 2.42 \), about 1.3 stops more light.
- New ISO: 3,200 / 2.42 ≈ 1,320, so about ISO 1,250 to 1,600.
Answer: About ISO 1,250 to 1,600, cutting noise noticeably. This is why fast wide lenses are prized for night work, though lens aberrations such as coma, which turns stars near the corners into bird shapes, vary greatly between lenses at wide apertures.
To reduce noise further, photographers stack several identical sky exposures in software that aligns the stars and averages random noise: stacking \( n \) frames improves the signal-to-noise ratio by about \( \sqrt{n} \). Some also use a star tracker, a motorized mount that rotates the camera to follow the sky, allowing exposures of minutes at low ISO; the foreground then blurs and must be shot separately and blended, which raises honesty questions discussed in Lesson 12.
Focusing in the dark
Autofocus rarely works on stars. Set the lens to manual focus, switch on live view, magnify a bright star or planet as much as possible, and turn the focus ring until the star is the smallest possible point. Do not trust the infinity mark on the lens: many lenses focus past infinity to allow for temperature changes. Once focused, tape the ring so it cannot move. Some photographers focus on a distant light or the moon before full darkness. For a close foreground, consider a separate foreground frame focused nearer, taken during blue hour or with low-level lighting, and blended later.
Dew is a common problem: on clear nights, lenses cool below the dew point and fog over. Battery-powered lens heaters, wrapped around the lens barrel, prevent this. Lesson 11 covers cold and battery management.
Star trails
Instead of avoiding trails, star trail images celebrate them. Long exposures, or many shorter exposures stacked together, record the stars' paths as arcs around the celestial pole, which lies very close to Polaris in the Northern Hemisphere. Pointing north produces concentric circles; pointing east or west produces diagonal lines; pointing south near the celestial equator produces nearly straight lines.
The arc each star traces depends on how long you shoot: about 15 degrees per hour around the pole. Stacking many 30-second exposures taken continuously is now the usual method, because a single exposure of an hour or more builds up noise and sky glow, and a stack lets you discard frames spoiled by aircraft or headlights.
Worked problem
Planning a star trail stack
A photographer wants star trails covering a 60-degree arc around Polaris, using 30 s exposures with a 1 s gap between frames. How long must the sequence run, and how many frames are needed?
Show solution
- Stars move about 15 degrees per hour around the pole.
- Time for 60 degrees: 60 / 15 = 4 hours.
- Each frame cycle is 31 s.
- Frames: 4 × 3,600 / 31 ≈ 465 frames.
Answer: About 4 hours and roughly 465 frames. Check that the battery, card capacity and lens heater will last, or plan battery changes that do not move the camera. The short gaps leave tiny breaks in the trails, which stacking software can fill.
Photographing the aurora
The aurora is bright compared with the Milky Way, and it moves, sometimes quickly. Exposures that are too long blur its structure into a smooth green glow. Typical starting settings are a fast wide lens at f/1.8 to f/2.8, ISO 800 to 3,200 and exposures of about 1 to 10 s, shorter for a fast-moving, bright display and longer for a faint glow. Keep the foreground in mind: snow, lakes and silhouetted trees make strong frames, and calm water doubles the colours with reflections.
Cameras record aurora colours more strongly than the eye sees them, because the eye's colour vision is weak in low light. A faint aurora that looks grey to the eye may appear green in a photograph. This is an honest record of light the sensor captured, but heavy saturation boosts can make displays look more vivid than any viewer saw; describe processing honestly when it matters.
For time-lapses of the aurora or the Milky Way, shoot sequences of identical frames at regular intervals with an intervalometer, then assemble them into video. Keep exposure manual so the sequence does not flicker.
Conserving the night
Night photographers have a special responsibility to protect the darkness they depend on. Use the dimmest light that works, preferably red, to preserve night vision and avoid disturbing others; avoid light painting at shared sites or in protected areas where it is prohibited or disturbs wildlife and other visitors; and support dark-sky policies in your community. Light painting, illuminating the foreground with a torch during the exposure, can produce striking images, but at popular sites it ruins other photographers' frames, and in some parks it is restricted.
Common mistakes
MistakeUsing the 500 rule on a high-resolution sensor and expecting pinpoint stars.
InsteadUse the NPF rule or test at full magnification.
MistakeTrusting the infinity mark for star focus.
InsteadFocus manually on a bright star in magnified live view and tape the ring.
MistakePlanning Milky Way shots for a full moon.
InsteadPlan around the new moon or when the moon is below the horizon.
MistakeUsing 20-second exposures for a fast-moving aurora.
InsteadShorten to about 1 to 5 s to keep structure.
MistakeLight painting at a busy shared viewpoint.
InsteadUse minimal red light, follow site rules and respect other photographers.
Summary and key terms
- The Bortle scale rates sky darkness from class 1 to 9; dark-sky preserves and parks protect night skies.
- Plan around the moon; the Milky Way core is best from about March to October in the north.
- Above about 48.5° N, the sky never reaches astronomical darkness near the June solstice.
- The 500 rule is generous; the NPF rule \( t ≈ (35N + 30p)/f \) suits high-resolution sensors.
- Fast lenses at f/1.4 to f/2.8 and ISO 1,600 to 6,400 are typical; stacking improves noise by about \( \sqrt{n} \).
- Star trails trace about 15 degrees per hour around the celestial pole.
- Aurora needs shorter exposures, often 1 to 10 s; cameras show colour more strongly than the eye.
Practice problems
Work each problem on paper first, then reveal the answer to check.
Maximum exposure by the 500 rule for a 14 mm lens on full frame?
Show answer
500/14 ≈ 36 s.
NPF limit for 14 mm at f/2.8 with 5.9 µm pixels?
Show answer
(98 + 177)/14 ≈ 19.6 s.
500 rule for 16 mm on APS-C (crop 1.5)?
Show answer
500/(16 × 1.5) ≈ 21 s.
Light gain from f/2.8 to f/1.4?
Show answer
Factor of 4, or 2 stops.
Noise improvement from stacking 16 frames?
Show answer
About √16 = 4 times better signal-to-noise.
Hours needed for a 90-degree star trail arc?
Show answer
6 hours.
Why avoid the full moon for the Milky Way?
Show answer
Moonlight brightens the sky and hides fainter stars.
Typical aurora exposure range?
Show answer
About 1 to 10 s.
Why tape the focus ring?
Show answer
To prevent it moving after careful star focusing.
What does a lens heater prevent?
Show answer
Dew forming on the lens.
Lesson quiz · 5 questions
Score 60% or more to complete this lesson.
Create a free account to save your progress, take quizzes and earn a certificate.