
VIS-110 · Lesson 12 of 12 · 25 min
Putting light and colour to work
The previous lessons separated light and colour into topics: physics, behaviour, measurement, quality, direction, natural light, colour temperature, perception, colour spaces, harmony and exposure. Real image making combines them all at once. Looking at a scene, an experienced photographer or cinematographer reads the existing light (where it comes from, how hard it is, what colour it is, how contrasty it is), decides what the image should feel like, and then chooses how to use, modify or add light, how to set colour and exposure, and how to keep everything safe and consistent. This final lesson presents a method for analyzing light, a workflow for planning and executing lighting, practical lighting kits and their uses, the electrical and physical safety essentials for working with lights, ethics and sustainability, and the capstone project for the course.
Reading light: a method
When analyzing an image or a location, ask a consistent set of questions:
- Sources: where does the light come from? Identify every source, including sun, sky, windows, lamps, screens and bounced light from walls and floors.
- Quality: is each source hard or soft? Look at shadow edges and highlights (Lesson 4).
- Direction: from which angle and height does the key light come? Where do shadows fall (Lesson 5)?
- Contrast: how dark are the shadows compared with the lit areas? What is the lighting ratio and the overall scene range?
- Colour: what is the colour temperature and tint of each source, and how do they mix (Lesson 7)?
- Intensity and falloff: how bright is the subject compared with the background, and how quickly does light fall off?
- Mood and meaning: what does the light make the viewer feel, and how does it direct attention?
Practising this analysis on films, photographs and paintings, and on everyday scenes, trains the eye. Catchlights in eyes, shadow edges, and the colour of white objects are reliable clues.
Planning and executing lighting
A practical workflow for lighting a scene or shoot:
- Define the intent: mood, time of day, story purpose and references (look book, mood board).
- Scout: visit the location at the relevant time, note the sun's path, windows, practical lights, power availability, ceiling height and colours of surfaces (Lesson 6).
- Decide the camera settings: target exposure (aperture for desired depth of field, shutter for motion and flicker, ISO for noise), white balance and recording format.
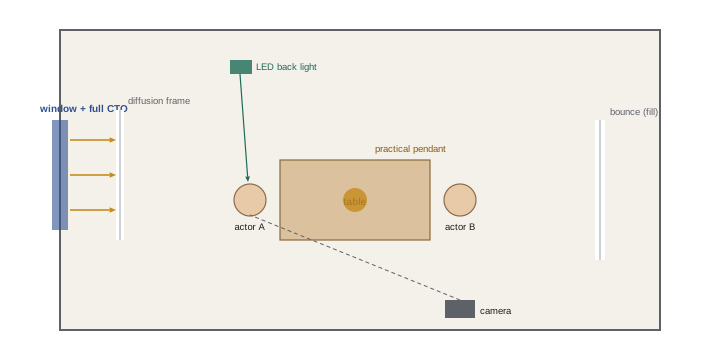
- Plan the lights: draw an overhead lighting plan showing key, fill, back, background and practical lights, their sizes, positions, modifiers and gels, and the power they need.
- Calculate: check that fixtures can deliver the required illuminance at their distances after diffusion (Lesson 3), and that power circuits are adequate.
- Build: set the key first, then check exposure and contrast, add fill or negative fill, then back and background lights, and finally practicals and accents.
- Measure and refine: meter key and fill, check the waveform or histogram and false colour, check colour with a grey card or colour chart, and adjust.
- Record: note fixture positions, settings and gels so shots can be matched later.
Lighting kits and their uses
| Tool | Character | Typical uses |
|---|---|---|
| Fresnel spotlights (tungsten, HMI or LED) | Focusable hard light with soft-edged beam | Key through diffusion, back light, sunlight effects |
| Open-face lights | Very efficient, hard and uneven | Bounce, lighting through large diffusion |
| LED panels and tubes | Soft or medium; often tunable colour | Fill, practical effects, small spaces, coloured accents |
| Large soft sources (softboxes, lanterns, book lights) | Soft, wrapping light | Faces, beauty, interior key light |
| HMI and large LED fixtures | Very powerful daylight-balanced | Sun through windows, exteriors, large spaces |
| Reflectors, bounce boards, flags, frames | Modify existing light | Fill, negative fill, cutting spill, diffusion |
| Practical lamps | Visible in the frame | Motivation, atmosphere and colour contrast |
Small productions and photographers increasingly rely on battery-powered LED fixtures with adjustable colour temperature, tint and effects, which reduce power needs and gel use. Larger productions combine LEDs with HMIs and tungsten fixtures for maximum output and particular qualities. Whatever the kit, modifiers, including diffusion, bounce, flags, grids and gels, often matter more than the light itself.
Electrical and physical safety
Lighting brings real hazards, and safety is everyone's responsibility on set:
- Electrical: know the capacity of circuits (a typical 15 A, 120 V household circuit can supply about 1,800 W, and should be loaded to no more than about 80 % continuously, about 1,440 W); avoid overloading power strips and extension cords; use heavy-duty cords rated for the load and protected from damage; use ground-fault (GFCI) protection near water and outdoors; keep cables tidy and taped or covered to avoid trips; and leave tie-ins to the building's electrical panel and generator work to qualified electricians.
- Heat: tungsten and HMI fixtures become hot enough to burn skin and ignite materials; keep gels and diffusion at safe distances, use gloves, and let fixtures cool before handling.
- Rigging: secure stands with sandbags, especially tall stands and booms, and use safety cables on anything overhead; never stand under suspended loads; follow wind limits for large frames and silks outdoors.
- Optical: avoid looking directly into powerful fixtures, protect people from ultraviolet from damaged HMI lenses, and follow laser safety rules.
- Ergonomics and fatigue: lift with care, use carts, and respect working hour limits, since fatigue causes accidents.
In Canada, follow the Canadian Electrical Code and provincial occupational health and safety rules; use equipment bearing CSA or equivalent certification marks, and be aware of provincial film industry safety guidelines and union rules, where applicable, for set lighting and rigging.
Worked problem
Checking a household circuit
A small crew wants to run a 1,000 W tungsten fresnel and two 150 W LED panels from one 15 A, 120 V household circuit in a client's home, which also has a 400 W refrigerator. Is this safe?
Show solution
- Fixtures: 1,000 + 2 × 150 = 1,300 W.
- Refrigerator (if on the same circuit): 400 W, giving 1,700 W total, and refrigerator compressors draw extra current when starting.
- Continuous safe limit: about 80 % of 1,800 W = 1,440 W.
- 1,700 W exceeds the limit. Move the fresnel to a separate circuit, replace it with an LED of equivalent output (perhaps 200 to 300 W), or confirm which outlets are on which circuits before plugging in.
Answer: Not safe as planned. Identify circuits, split the load, or use more efficient LED fixtures; never defeat breakers or use undersized cords.
Ethics and sustainability
Light and colour can be used to flatter, persuade or mislead. Lighting and grading choices can make a product look better than it is or change how a person or place is perceived. Documentary and news image makers have particular obligations to avoid misleading manipulation of colour and light, and commercial work must not misrepresent products. Lighting choices also have environmental costs: generators burn fuel and pollute, tungsten lights waste most of their energy as heat, and large productions consume enormous amounts of power. Using efficient LED fixtures, grid power or battery systems instead of diesel generators where possible, and planning to use natural light efficiently, reduce environmental impact and often cost. Many productions now follow sustainability guidelines and report their carbon footprint.
Capstone project
The capstone for this course is a light and colour study portfolio demonstrating the concepts of every lesson. It includes:
- A light diary: photographs of the same subject or place at several times of day and in different weather, with notes on direction, quality, colour and intensity (Lessons 1, 4 and 6).
- A quality study: the same portrait lit with a small hard source and with a large soft source at different distances, with measurements of source size and distance (Lesson 4).
- A direction and contrast study: portraits in front, 45°, side and back light, and three lighting ratios measured with a meter or the camera (Lesson 5).
- A measurement exercise: illuminance readings at different distances from a light to verify the inverse square law, and exposure calculations (Lesson 3).
- A colour temperature study: a mixed-light scene corrected with gels or white balance, and the same scene with the mix embraced, with mired calculations (Lesson 7).
- A perception and colour exercise: a design checked for colour vision deficiency and a palette built with a chosen harmony scheme (Lessons 8 to 10).
- An exposure exercise: difficult scenes (snow, dark subjects, backlight) exposed using compensation, histograms or waveforms, with notes (Lesson 11).
- A final image or short sequence with an overhead lighting plan and a written analysis of light and colour using the method in this lesson.
Collaboration on set
On film and television sets, light is a team effort. The director of photography designs the lighting with the director; the gaffer, head of the electrical department, plans and executes it with electricians who place and power fixtures; the key grip and grips handle rigging, flags, frames and diffusion; and the digital imaging technician monitors exposure and colour on set. Clear communication, using shared vocabulary for quality, direction, ratios and colour temperature, makes this collaboration efficient. Photographers on smaller shoots may combine all these roles, but the same planning and safety principles apply.
Continuing to learn
Light and colour reward lifelong study. Keep observing light in daily life, analyze images that move you, experiment with new tools, and revisit the fundamentals in this course as your work develops. Later courses in lighting, camera systems, colour grading and specialized photography build directly on these foundations, adding equipment, techniques and creative approaches, but always relying on the same physics and perception covered here.
Above all, practise deliberately: decide what you want the light and colour to do before you start, measure as you work, and compare the results with your intention. That cycle of intention, execution and review is how image makers develop a reliable personal style.
The capstone portfolio is also a personal reference you can return to. Seeing the same subject under hard and soft light, at different ratios and colour temperatures, side by side with your own measurements and notes, creates a lasting guide to how light behaves with your camera and your style. Many professionals keep similar test books and update them whenever they adopt new equipment.
As you complete the course, remember the central lesson: every image is made of light, and understanding light is understanding images.
A final checklist
Before any shoot, it helps to run through a short checklist drawn from the whole course. What is the intended mood and look? Where will the light come from, and is it motivated? What quality, direction and contrast will support the mood? What colour temperature will the camera be set to, and how will other sources relate to it? Is there enough light for the chosen exposure, and will the scene fit the camera's dynamic range? What colour palette will the design, wardrobe and lighting create? How will exposure be measured and kept consistent? Is the power plan safe, and are stands and rigging secure? Answering these questions in advance turns the knowledge in this course into reliable results.
Good luck with your capstone, and keep looking at the light around you: it is the raw material of every image you will ever make. Every scene, from a sunrise to a kitchen at night, is a lesson in light for those who take the time to look.
The habits built here, observing, planning, measuring and reviewing, will serve you in every later course.
Keep your capstone notes; they will be useful long after this course ends.
Common mistakes
MistakeStarting to set lights before defining the intended mood.
InsteadDefine intent and references first.
MistakeAdding lights without a plan or measurements.
InsteadDraw a lighting plan, meter and refine.
MistakeOverloading household circuits.
InsteadCalculate loads and stay within about 80 % of capacity.
MistakeLeaving tall stands unweighted.
InsteadSandbag stands and use safety cables overhead.
MistakeIgnoring the environmental cost of lighting.
InsteadPrefer efficient fixtures and clean power sources.
Summary and key terms
- Read light by sources, quality, direction, contrast, colour, intensity and mood.
- Plan lighting from intent, scouting, camera settings, plans and calculations.
- Build from the key light, then fill, back, background and practicals; measure and record.
- Lighting kits combine fresnels, open faces, LEDs, soft sources, HMIs, modifiers and practicals.
- Safety covers electrical load, heat, rigging, optical hazards and fatigue.
- Use light and colour ethically and choose efficient, lower-impact equipment.
- The capstone portfolio demonstrates every concept with measurements and analysis.
- Lighting plan
- An overhead diagram of lights, positions and modifiers.
- Motivation
- A believable source that justifies the lighting.
- Practical
- A light fixture visible in the frame.
- Fresnel
- A focusable fixture with a stepped lens.
- HMI
- A powerful daylight-balanced discharge light.
- Book light
- A soft source made by bouncing into a frame and diffusing.
- GFCI
- Ground-fault circuit interrupter protection.
- Sandbag
- A weight securing a light stand.
- Safety cable
- A cable preventing overhead equipment from falling.
- Light diary
- A record of observed light over time.
Practice problems
Work each problem on paper first, then reveal the answer to check.
List the questions in the reading-light method.
Show answer
Sources, quality, direction, contrast, colour, intensity and falloff, mood.
Which light should be set first?
Show answer
The key light.
Why record fixture positions and settings?
Show answer
To match shots later.
What is the continuous limit on a 15 A, 120 V circuit?
Show answer
About 1,440 W.
Why use GFCI protection outdoors?
Show answer
To protect against shock near water and ground.
Name three heat precautions.
Show answer
Keep gels at distance, use gloves, let fixtures cool.
Why sandbag stands?
Show answer
To prevent tipping, especially tall stands and booms.
Name two sustainable lighting choices.
Show answer
LED fixtures and grid or battery power instead of diesel generators.
What does the capstone light diary record?
Show answer
The same subject at different times and weather, with notes.
What should accompany the final capstone image?
Show answer
An overhead lighting plan and a written analysis.
Lesson quiz · 5 questions
Score 60% or more to complete this lesson.
Create a free account to save your progress, take quizzes and earn a certificate.