
PHOT-210 · Lesson 10 of 12 · 25 min
Multiple-light setups and color
With one light understood thoroughly, photographers add lights to solve specific problems: filling shadows, separating the subject, lighting the background, adding highlights or creating mood. Each additional light should have a clear job and be adjustable independently. Color adds another dimension: gels change the color of lights for correction or effect, and mixing color temperatures can create mood or cause problems. This lesson covers the roles of lights in multi-light setups, classic two-, three- and four-light portraits, lighting groups, building and documenting setups, color temperature and white balance with flash, correction gels, creative color gels, mixing flash with continuous and ambient light, and avoiding common multi-light problems.
Roles of lights
Each light in a setup has a role, described by its position and purpose:
- Key light: the main light, establishing the pattern and exposure.
- Fill light: reduces shadow density without creating its own pattern.
- Hair light: lights the hair from above and behind.
- Rim or kicker lights: outline the edges from behind or beside.
- Background light: lights the background for tone, color or separation.
- Accent lights: highlight a specific detail, such as a product, prop or part of the set.
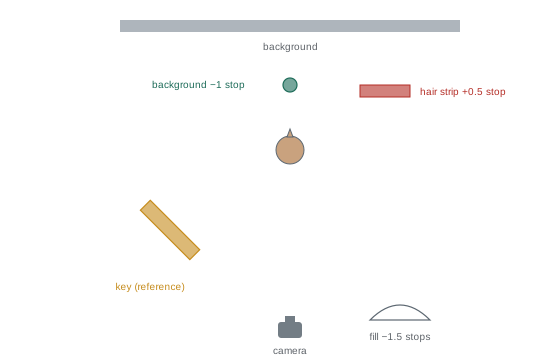
A setup is described by naming each light and its position, modifier and power or reading relative to the key, often recorded in a lighting diagram. Thinking in roles helps you add only the lights you need and understand why each exists.
Two-light portraits
Two-light setups are versatile and often all a portrait needs. Common combinations include key plus fill, where a large soft key creates the pattern and a fill near the camera controls the ratio; key plus background light, using a reflector for fill and a second light to light or color the background; and key plus rim, where a soft key in front and a strip box behind create a sculpted, separated look. A popular high-contrast fashion setup uses a single beauty dish as key and a strip box as rim, with no fill. Each light should be metered and adjusted individually.
Three-point lighting
Three-point lighting, the classic setup of film, television and studio portraiture, combines a key, a fill and a back or hair light. The key sits about 30 to 45 degrees to one side and above; the fill sits near the camera on the opposite side, softer and dimmer; and the back light sits behind and above the subject, opposite the key, aimed at the hair and shoulders. Together they model the face, control shadows and separate the subject from the background. Many variations exist: replacing the fill with a reflector, adding a background light as a fourth source, or using two rim lights instead of a single back light. Three-point lighting is a starting template; real setups adapt it to the subject and mood.
Lighting groups
Groups need even light so that everyone is exposed similarly and no one is lost in shadow. Approaches include using one or two large sources placed farther back and higher, so that the difference in distance between the nearest and farthest person is small relative to the overall distance (Lesson 5); feathering the key across the group so that people nearer the light receive the edge of the beam and those farther away the center; using a large fill from near the camera; and arranging people in staggered rows so that faces are not shadowed by those in front. Smaller apertures, such as f/8 to f/11, keep everyone in focus. For large groups, two or four lights placed symmetrically at 45 degrees to each side give even coverage. Check for glare on glasses by raising lights or having people tilt their heads slightly.
Worked problem
Even light for a group of eight
Eight people stand in two rows spanning about 3 m. A single softbox 2 m from the nearest person makes the far end two-thirds of a stop darker. How can the light be evened out?
Show solution
- Move the softbox back to about 4 m and raise it, increasing power by about 2 stops.
- Feather it so the center of the beam points toward the far end of the group.
- Add a second softbox on the opposite side at a similar distance, or a large umbrella fill near the camera.
- Meter at each end of both rows and adjust until readings are within about a third of a stop.
Answer: Move the light farther back with more power, feather it toward the far side, add a second source and meter at both ends until within a third of a stop.
Building and documenting setups
Professional photographers record their setups so that they can reproduce them for consistent results across sessions, products or team headshots taken months apart. A lighting diagram shows the positions of subject, camera, background and each light, with modifiers, distances, heights, angles, power settings and meter readings. Apps and templates make clean diagrams, but a quick sketch with notes works too. Photographs of the setup from the camera position and from above are invaluable. Marking light and subject positions with tape on the floor speeds up rebuilding. For corporate clients who need matching headshots of employees at different times and places, a documented setup is essential.
Color temperature and white balance with flash
Studio flashes are daylight-balanced, typically 5,500 to 5,800 K, and the camera's flash or daylight white balance renders them neutral. For accuracy, set a custom white balance from a gray card or set white balance in editing from a gray card in the first frame. Modeling lights and LED continuous lights may differ slightly in color from the flash, which matters only when they contribute to the exposure. Different flash brands and models, and even the same model at different power settings, can vary slightly; color-consistency modes and testing help when matching lights precisely, for example for product photography.
Correction gels
Gels are thin sheets of colored, heat-resistant film placed over lights. Correction gels change color temperature to match other sources: CTO (color temperature orange) warms a daylight-balanced flash toward tungsten, with full, half and quarter strengths; CTB (color temperature blue) cools a tungsten source toward daylight; plus-green and minus-green gels correct green tints, for example to match fluorescent lighting. A common technique when photographing in a room lit by warm tungsten lights is to gel the flash with full CTO and set the camera to tungsten white balance: the subject lit by flash looks neutral and the background lit by the room lights also looks natural. Gel strengths are often described in mireds, a unit that makes color temperature shifts additive.
| Gel | Typical effect | Use |
|---|---|---|
| Full CTO | About 5,500 K to 3,200 K | Match flash to tungsten |
| Half CTO | About 5,500 K to 3,800 K | Warm flash, sunset look |
| Quarter CTO | Slight warming | Flattering warm skin |
| Full CTB | About 3,200 K to 5,500 K | Match tungsten to daylight |
| Plus green | Adds green | Match fluorescent lighting |
| Creative colors | Red, blue, teal, magenta, etc. | Backgrounds and effects |
Creative color
Creative gels in saturated colors transform backgrounds, rim lights and even key lights. Popular approaches include gelled background lights that turn a gray or white background any color; complementary colors on two rim lights, such as teal and orange or blue and magenta, for a vivid, contemporary look; colored key light for fashion and music portraits; and color contrast between a neutral key and a colored background. RGB LED lights offer adjustable color without gels. Colored light on a white background desaturates because white reflects all colors; gels work best on gray or darker backgrounds, and on white backgrounds the colored light must be brighter than any white spill. Expose carefully, because saturated colors can clip in one channel and lose detail (PHOT-202). PHOT-211 explores gels and color further.
Mixing flash with continuous and ambient light
Many portraits combine flash with continuous light, for example practical lamps in a set, a window in the background or LED accents. Because flash exposure depends on power and aperture while ambient exposure depends on shutter speed (Lesson 3), you can balance them: set the aperture and flash for the subject, then choose a shutter speed that brings the ambient light to the desired level, such as 1/30 s to let a lamp glow. Slower shutter speeds risk blur from ambient light on a moving subject, which can be avoided by keeping ambient light on the subject low, using rear-curtain sync for creative blur, or using a tripod. Color temperatures must be considered: a warm tungsten lamp will look orange under daylight-balanced flash unless the flash is gelled or the effect is wanted.
Avoiding common multi-light problems
More lights mean more potential problems. Watch for multiple nose shadows and catchlights from competing lights; lens flare from rim and hair lights shining into the lens, prevented with flags, grids and lens hoods; uneven background lighting; spill from background lights onto the subject; inconsistent color between lights; and setups so complex that small changes in subject position break them. If a setup is not working, turn off all lights except the key and rebuild, one light at a time. Often, removing a light improves the image.
Cross lighting and split rims
Cross lighting uses two lights placed on opposite sides of the subject, often slightly behind, each lighting one side of the face or body. It creates a bright edge on both sides with a darker central strip, a dramatic look used for athletes, musicians and products. Variations include two strip boxes at 135 degrees on each side as rims, with a soft key in front to light the face, a classic high-contrast fitness setup. Cross lighting must be controlled carefully, since each light can flare into the lens and both can create bright hot spots on shiny skin; flags, grids and careful angles help.
Color harmony with gels
When using colored gels, consider color relationships. Complementary pairs, such as blue and orange or teal and red, create energy and contrast; analogous pairs, such as magenta and purple, create a coherent mood. A neutral key light on the face with colored rims or background keeps skin natural while adding color, a widely used approach; colored key light on the face is bolder and needs careful exposure so that skin retains detail. Saturated colors can clip in one channel even when overall exposure looks correct, so check the RGB histogram. RGB LED lights and app-controlled strobes with color modes make experimentation easy.
Building a setup from a single light
An effective way to design a multi-light setup is to start with one light and ask what is missing. If shadows are too dark, add fill; if the subject merges with the background, add a hair or rim light; if the background is too dark or plain, add a background light; if a detail needs emphasis, add an accent. Stop as soon as the image works. This approach produces clean, purposeful lighting and makes troubleshooting easier, because each light was added for a reason that can be checked.
Lighting couples and small groups
Couples and small groups of two to four people can often be lit with a single large key placed far enough back to cover everyone, plus a reflector or fill. Position people so their faces are at similar distances from the key, turn them slightly toward the light, and check that no one casts a shadow on another. Adding a broad background light and a pair of rim lights separates the group from the background without competing with faces.
As setups grow more complex, naming each light in the trigger, for example key, fill, hair and background, avoids confusion when adjusting power quickly during a session.
Common mistakes
MistakeAdding lights without a clear role.
InsteadGive each light a job and test it alone.
MistakeLighting groups with a close single light.
InsteadMove lights back, feather, and meter both ends.
MistakeNot documenting setups for repeat clients.
InsteadDraw diagrams, photograph setups and mark the floor.
MistakeGelled color on a white background looking washed out.
InsteadUse gray or dark backgrounds and control white spill.
MistakeRim lights causing flare.
InsteadFlag or grid them and use a lens hood.
Summary and key terms
- Lights have roles: key, fill, hair, rim, background and accent.
- Two-light setups are versatile; three-point lighting is a classic template.
- Groups need distant, feathered, even light and metering at both ends.
- Document setups with diagrams, photos and floor marks.
- Flash is daylight-balanced; correction gels match other sources.
- Creative gels color backgrounds and rims; gray backgrounds show color best.
- Balance flash and ambient with aperture, power and shutter speed.
- Key light
- Main light establishing the pattern.
- Accent light
- Light highlighting a specific detail.
- Three-point lighting
- Key, fill and back light setup.
- Lighting diagram
- Plan of a lighting setup with settings.
- Gel
- Colored film placed over a light.
- CTO
- Color temperature orange correction gel.
- CTB
- Color temperature blue correction gel.
- Mired
- Unit for color temperature shifts.
- RGB light
- Light producing adjustable colors.
- Dragging the shutter
- Using a slow shutter to add ambient light.
Practice problems
Work each problem on paper first, then reveal the answer to check.
Name the six roles of lights.
Show answer
Key, fill, hair, rim, background, accent.
Describe a key plus rim setup.
Show answer
Soft key in front, strip box behind.
What are the three points in three-point lighting?
Show answer
Key, fill and back light.
How do you even light across a group?
Show answer
Move lights back, feather, add sources, meter both ends.
Why document setups?
Show answer
To reproduce them consistently.
Typical flash color temperature?
Show answer
About 5,500–5,800 K.
What does full CTO do?
Show answer
Converts daylight flash to about tungsten.
Mired value of 5,000 K?
Show answer
200.
Why do gels look washed out on white?
Show answer
White reflects all colors, including white spill.
How do you make a background lamp glow?
Show answer
Use a slower shutter speed.
Lesson quiz · 5 questions
Score 60% or more to complete this lesson.
Create a free account to save your progress, take quizzes and earn a certificate.