
PHOT-210 · Lesson 4 of 12 · 25 min
Metering and exposure in the studio
In the studio, exposure is a matter of measurement rather than guesswork. Because the photographer controls every light, each can be measured precisely and adjusted to a chosen value, and the same values can be reproduced next week or next year. Light meters, histograms, highlight warnings and test shots are the tools; the goal is consistent, correct exposure that leaves the image's tones exactly where the photographer wants them. This lesson covers why camera meters fail with flash, flash meters and incident metering, guide numbers, metering individual lights and ratios, using the histogram and test shots, gray cards and color targets, choosing aperture and ISO in the studio, and a step-by-step metering routine.
Why camera meters fail with flash
A camera's built-in meter measures continuous light before the exposure. With studio flash, the meter sees only the dim modeling lights and room light, not the flash that will make the exposure, so it is useless for setting manual flash exposure. TTL flash metering, which measures a pre-flash, works with compatible flashes, but its reflected-light measurement is fooled by subjects that are darker or lighter than average, such as a black dress on a white background, and it changes power as framing changes. Studio photographers therefore use manual flash power, measured with an incident flash meter or confirmed with test shots, the histogram and highlight warnings.
Flash meters and incident metering
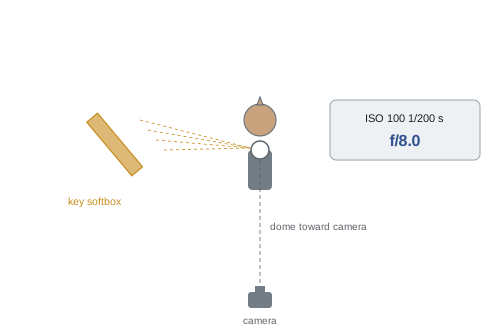
A flash meter is a handheld light meter that can measure a burst of flash. It is set to the camera's ISO and shutter speed, held at the subject's position, and the flash is fired, either by a cable, by a radio module in the meter, or by setting the meter to wait for the flash and firing it from the camera or trigger. The meter displays the aperture that will give a correct exposure for a middle-gray subject in that light. Most studio metering is incident metering: the meter's white dome is placed at the subject's position, usually in front of the face, pointed toward the camera or toward a particular light. Because incident meters measure the light falling on the subject, they ignore the subject's reflectance: dark skin, pale skin, black clothing and white clothing are all rendered correctly in relation to one another, which is why incident metering is the studio standard. A dome measures the combined effect of all lights on a three-dimensional subject; a flat disc, available on many meters, measures light from one direction and is used to measure individual lights for ratios.
Reading the meter
Meters typically display the aperture in full stops plus tenths, such as f/8.0 or f/8.0 + 0.3, meaning f/8 plus three tenths of a stop, or approximately f/9. Some meters display the reading in thirds to match camera settings. If the meter suggests f/8.0 and you want f/5.6 for shallower depth of field, reduce the flash power by one stop and remeasure, rather than simply opening the lens, which would overexpose. If you want a deeper depth of field at f/11, raise the power by one stop or move the light closer. Meters also show the contribution of ambient light in some modes, as a percentage of the total exposure, which helps check that ambient light is negligible.
Guide numbers
Before meters were common, and still today for quick calculations, photographers used guide numbers. A guide number (GN) describes a flash's power: for a bare flash at a given ISO, usually 100, it equals the distance from flash to subject multiplied by the aperture needed for correct exposure. Guide numbers are given in meters or feet, so check which, and they assume a particular zoom setting or reflector. They are most useful for speedlights used without modifiers, since modifiers absorb and spread light in ways that change the effective guide number.
Worked problem
Using a guide number
A speedlight has a guide number of 40 (meters, ISO 100) at the zoom setting used. The subject is 5 m away. What aperture gives correct exposure at ISO 100? What if ISO is raised to 400?
Show solution
- N = 40 ÷ 5 = 8, so f/8 at ISO 100.
- Raising ISO from 100 to 400 is two stops, which multiplies the guide number by 2 (each stop multiplies it by about 1.4).
- GN at ISO 400 = 80, so N = 80 ÷ 5 = 16, f/16.
Answer: f/8 at ISO 100 and f/16 at ISO 400.
Metering individual lights
To set a lighting ratio or check each light's contribution, meter each light separately with the others turned off, using a flat disc or a dome pointed toward that light. For example, the key light might read f/8 and the fill f/4, a two-stop difference giving a 4:1 ratio (Lesson 8); a hair light might read f/8 from behind, measured with the meter pointed back toward it; and the background might be measured at the background itself. Then meter all lights together with the dome pointed at the camera to set the final exposure, which will be slightly brighter than the key alone because the fill adds light. Recording these readings in notes or a lighting diagram lets you reproduce the setup precisely.
| Measurement | Method | Typical use |
|---|---|---|
| Key alone | Disc or dome toward key, others off | Set main exposure and pattern |
| Fill alone | Disc toward fill, others off | Set lighting ratio |
| Hair or rim | Dome or disc toward the light from subject | Balance accents with key |
| Background | Meter at background | Set background tone |
| All lights | Dome at subject toward camera | Final camera exposure |
The histogram and test shots
Many studio photographers work without a meter, using test shots, the histogram and highlight warnings, often reviewed on a tethered computer. This works well once you understand what the histogram shows: the camera's JPEG rendering, which may have less highlight headroom than the raw file (PHOT-201). A practical approach is to expose a test shot, check that skin and important highlights are not clipped, using the highlight warning and the RGB histogram, and adjust power in small steps. Tethered shooting displays images large on a calibrated monitor with raw-based histograms and clipping warnings, giving more reliable feedback than the camera's small screen. Meters remain faster for setting ratios and reproducing setups, and many professionals use both.
Gray cards and color targets
A gray card placed in the subject's position and photographed at the start of a session, or whenever the lighting changes, gives a reference for exposure and white balance. In editing, clicking the gray card with the white balance tool sets accurate color for every image in that setup; its brightness confirms exposure. Color targets such as the ColorChecker extend this with known color patches for creating custom camera profiles, especially valuable for product and fashion work where color accuracy matters (PHOT-202). Many photographers ask the subject to hold the card in the first frame, then continue shooting.
Choosing aperture and ISO in the studio
In the studio, the photographer usually chooses the aperture first, based on the depth of field required, then sets the lights to suit. Typical choices include f/8 to f/11 for products, groups and full-length portraits, where everything must be sharp; f/5.6 to f/8 for head-and-shoulders portraits with a short telephoto, giving sharp eyes and nose with a softly focused background; and f/2.8 to f/4 for shallow-focus looks, which require low flash power, ND filters on the lights, or moving lights away. ISO is usually kept at the camera's base, such as ISO 100, for maximum image quality, and raised only if flash power is insufficient. Shutter speed is set at or just below the sync speed, such as 1/160 or 1/200 s, to minimize ambient light. Because flash duration freezes motion, a tripod is not required for sharpness, though it helps maintain consistent framing.
A step-by-step studio metering routine
A reliable routine for a portrait setup:
- Set the camera: manual mode, base ISO, shutter at or below sync speed, chosen aperture, white balance to flash or a custom setting.
- Darken the room and take a flash-off test frame to confirm ambient light is negligible.
- Place the key light, adjust its position while watching the modeling light, and meter it at the subject. Adjust power until it reads the chosen aperture.
- Add fill and meter it separately for the desired ratio.
- Add hair, rim and background lights one at a time, metering each.
- Meter all lights together and set the final aperture.
- Photograph a gray card and color target.
- Take test shots, check the histogram, highlights and skin on a large screen, and fine-tune.
- Note the readings and draw a lighting diagram.
Exposure for skin and creative intent
The meter gives a technically correct exposure for middle gray, which renders skin, clothing and backgrounds in their natural relationship. Creative decisions may depart from it. High-key portraits may be exposed a third to two-thirds of a stop brighter; moody low-key portraits may be exposed slightly darker, with careful attention to skin detail. Skin of all tones should be well exposed and retain texture: rather than forcing different skin tones to the same brightness, light and expose each person so their skin looks rich and natural, which incident metering naturally supports.
Calibrating meter and camera
Meters, cameras and editing software do not always agree exactly. To calibrate them, light a gray card evenly, meter it with your incident meter, set the camera to the indicated aperture, photograph the card, and check its value in your raw processor. A correctly exposed 18 % gray card typically reads around 45 to 50 % brightness or an RGB value of roughly 115 to 125 in an sRGB rendering, depending on the profile and tone curve. If your images are consistently darker or brighter than expected, apply a calibration offset to your meter, which many meters allow, or remember to adjust by the difference. Repeat the test when you change cameras or raw processing defaults.
Exposure latitude and safety margins
Raw files from modern cameras have generous latitude, so studio exposures within about a third of a stop of ideal are easily corrected. However, highlights such as white clothing, specular highlights on skin and white backgrounds clip permanently if overexposed, while shadows can be brightened. Many studio photographers therefore expose slightly conservatively for subjects with important bright tones, such as brides in white or products in white packaging, and check highlight warnings carefully. For darker subjects and low-key work, a slightly brighter exposure keeps shadow noise low, with the final darkness set in editing.
Metering with continuous light
With continuous LED or tungsten light, a handheld meter in ambient mode, or the camera's own meter combined with a gray card, works well, since the light is visible and constant. Incident readings still give the most consistent results across subjects. Set the meter's shutter speed to your chosen value, often 1/125 s or slower, and read the aperture, or set the aperture and read the shutter speed. Remember that continuous lights may flicker at certain shutter speeds, so test before an important shoot.
Metering for multiple subjects
For couples, families and groups, meter at each person's position, especially those nearest and farthest from the key. Readings within about a third of a stop are acceptable; larger differences call for moving or feathering lights so that everyone is exposed similarly.
Common mistakes
MistakeUsing the camera's meter to set studio flash.
InsteadUse an incident flash meter or test shots.
MistakeOpening the aperture to change depth of field without changing power.
InsteadAdjust flash power to match the new aperture.
MistakeMetering with the dome pointed away from the camera for final exposure.
InsteadPoint the dome toward the camera for the combined reading.
MistakeJudging exposure on the small camera screen.
InsteadUse histograms, highlight warnings and tethering.
MistakeForgetting to note settings.
InsteadRecord readings and draw lighting diagrams.
Summary and key terms
- Camera meters cannot measure studio flash; TTL is fooled by subject tone.
- Incident flash meters at the subject position give consistent exposure.
- Guide number equals distance times aperture for a bare flash.
- Meter lights individually for ratios and together for final exposure.
- Histograms, highlight warnings and tethering confirm exposure.
- Gray cards and color targets give references for editing.
- Choose aperture for depth of field and set lights to match, at base ISO and sync speed.
- Flash meter
- Handheld meter that measures flash bursts.
- Incident metering
- Measuring light falling on the subject.
- Dome
- Hemispherical meter diffuser for three-dimensional subjects.
- Flat disc
- Meter diffuser for measuring individual lights.
- Guide number
- Flash power figure equal to distance times aperture.
- Tethering
- Connecting the camera to a computer for review.
- Highlight warning
- Display of clipped areas.
- Gray card
- Neutral 18 % reflectance reference.
- Color target
- Chart of known colors for profiling.
- Lighting diagram
- Drawing recording a lighting setup.
Practice problems
Work each problem on paper first, then reveal the answer to check.
Why does the camera meter fail with studio flash?
Show answer
It measures only continuous light before the flash.
Why is incident metering the studio standard?
Show answer
It ignores subject reflectance.
What does f/8.0 + 0.3 mean?
Show answer
f/8 plus three tenths of a stop.
GN 32, subject at 4 m: aperture?
Show answer
f/8.
GN 32 at ISO 100; what is it at ISO 200?
Show answer
About 45.
Key reads f/11, fill f/5.6: ratio?
Show answer
Two stops, 4:1.
What does the histogram show?
Show answer
The camera's JPEG rendering of tones.
Typical aperture for head-and-shoulders portraits?
Show answer
f/5.6–f/8.
Why keep base ISO in the studio?
Show answer
Maximum image quality.
What should be photographed at the start of a setup?
Show answer
A gray card and color target.
Lesson quiz · 5 questions
Score 60% or more to complete this lesson.
Create a free account to save your progress, take quizzes and earn a certificate.