
CON-110 · Lesson 12 of 12 · 27 min
Inspection and testing of sitework, concrete and masonry; capstone
Throughout this course, every material and method has come with checks: bearing surfaces confirmed, fill compacted and tested, reinforcement inspected, concrete tested, masonry reviewed. Inspection and testing are how the construction team, the owner and the authorities know that the work meets the design. They also protect the constructor, because accurate records show what was done and help resolve disputes. This final lesson brings those checks together: who inspects and tests, the inspection and test plan, the standard field tests for concrete, strength testing and acceptance criteria, what happens when results fail, testing of soils and masonry, documentation and nonconformance, and a capstone exercise that follows a small building from site preparation to masonry walls.
Who inspects and tests
Several parties share responsibility for quality:
- The contractor is responsible for building the work in accordance with the contract documents and for its own quality control, including checking its subcontractors.
- Independent testing agencies, usually retained by the owner, perform materials testing such as soil compaction, concrete and masonry tests, and report results to the owner, designer and contractor.
- The geotechnical engineer reviews bearing surfaces, fill and excavation conditions.
- The structural engineer and architect perform field reviews to confirm general conformance with the design.
- The authority having jurisdiction (the building department) performs code inspections at defined stages for permits.
In Canada, provincial building codes and professional engineering acts require field reviews by the registered professionals responsible for the design of many buildings, and municipalities perform permit inspections. Testing laboratories are commonly certified under CSA A283 for concrete testing, and many belong to the Canadian Council of Independent Laboratories (CCIL), which also certifies field technicians.
The inspection and test plan
An inspection and test plan (ITP) lists, for each part of the work, what will be inspected or tested, by whom, how often, against what criteria, which hold points require approval before work continues, and what records will be kept. For the work in this course, an ITP might include the following items.
| Activity | Inspection or test | Typical frequency | Hold point |
|---|---|---|---|
| Excavation to bearing | Geotechnical review of bearing surface | Every footing or area | Yes, before concrete |
| Engineered fill | Field density and moisture tests | Per lift and area, as specified | Yes, before next lift |
| Formwork and shoring | Dimensions, bracing, engineer review | Every placement | Yes |
| Reinforcement | Size, spacing, cover, laps | Every placement | Yes |
| Fresh concrete | Slump, air, temperature, density | First truck and with each strength sample | Reject or accept load |
| Concrete strength | Cylinders at 7 and 28 days | Per volume and day, as specified | No, but tracked |
| Masonry | Mortar, grout, ties, flashings, reinforcement | Ongoing; before grouting or covering | Before grouting |
Field tests on fresh concrete
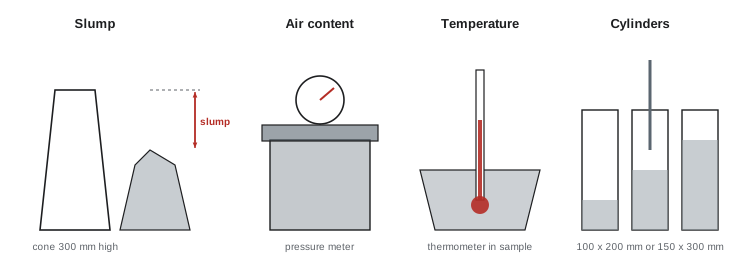
When concrete arrives, the testing technician samples it according to standard procedures, usually from the middle of the load, and performs field tests:
- Slump test: concrete is placed in a cone 300 mm (12 in) high in three layers, each rodded 25 times; the cone is lifted and the drop of the concrete is measured. Slump measures consistency, not strength, and changes in slump from truck to truck often signal changes in water content. Self-consolidating concrete is tested by slump flow, the spread diameter.
- Air content: measured with a pressure meter for normal aggregates or a volumetric (roll-a-meter) method for lightweight aggregates; air-entrained concrete must fall within the specified range, often 5 % to 8 %.
- Temperature: measured with a thermometer to check against specified limits.
- Density (unit weight): used to check yield and air content.
- Making strength specimens: cylinders are filled in layers, rodded or vibrated, finished, covered and left on site under controlled conditions for the initial curing period, then transported to the laboratory for standard curing.
In Canada, the corresponding test methods are in CSA A23.2, including A23.2-1C (sampling), A23.2-3C (making and curing specimens), A23.2-4C (air content by the pressure method), A23.2-5C (slump), A23.2-6C (density and yield), A23.2-9C (compressive strength of cylinders) and A23.2-17C (temperature). Initial site curing must keep cylinders within a specified temperature range, commonly 15 °C to 25 °C.
If field tests fall outside the specification, the load may be adjusted where permitted (for example, by an allowed addition of admixture or limited water within the mix design), retested, or rejected. Rejection decisions should be made quickly, before the concrete is placed, and recorded on the ticket.
Compressive strength testing
Cylinders are tested by crushing them in a compression machine, usually at 7 days for early information and 28 days for acceptance, with extra cylinders held in reserve. Common sizes are 100 × 200 mm and 150 × 300 mm in Canada and 4 × 8 in and 6 × 12 in in the United States. The compressive strength is the maximum load divided by the cross-sectional area:
Worked problem
Calculating cylinder strength
A 100 mm diameter cylinder fails at a load of 262 kN. A 4 in diameter cylinder from another project fails at 52,500 lbf. Calculate each compressive strength.
Show solution
- Area of the 100 mm cylinder: π × 100² ÷ 4 = 7,854 mm².
- Strength: 262,000 N ÷ 7,854 mm² ≈ 33.4 MPa.
- Area of the 4 in cylinder: π × 4² ÷ 4 = 12.57 in².
- Strength: 52,500 ÷ 12.57 ≈ 4,180 psi.
- A strength test result is the average of the cylinders from the same sample tested at the same age, as defined by the governing standard, not a single cylinder.
Answer: About 33.4 MPa for the metric cylinder and about 4,180 psi for the imperial one.
Acceptance criteria
Because concrete strength varies, acceptance criteria look at both the running average and individual tests.
Under CSA A23.1, a strength test is the average of the cylinders (typically two) from a sample tested at 28 days, and the concrete meets the specified strength when the average of any three consecutive strength tests equals or exceeds \(f'_c\) and no single test falls more than 3.5 MPa below \(f'_c\). Tests are typically required at least once for each 100 m³ of each class of concrete and at least once each day the class is placed, or as specified.
Worked problem
Evaluating a series of strength tests
Concrete with a specified strength of 32 MPa gives four consecutive 28-day strength test results: 34.2, 31.5, 33.0 and 29.8 MPa. Apply the CSA criteria. Then apply the ACI criteria to a 4,000 psi mix with results of 4,210, 3,850, 4,080 and 3,560 psi.
Show solution
- CSA, averages of three: (34.2 + 31.5 + 33.0) ÷ 3 = 32.9 MPa, which meets 32; (31.5 + 33.0 + 29.8) ÷ 3 = 31.4 MPa, which does not.
- CSA, individual tests: the lowest is 29.8 MPa, which is 2.2 MPa below 32, within the 3.5 MPa limit.
- The metric concrete therefore fails the running-average criterion for the last three tests and must be investigated.
- ACI, averages of three: (4,210 + 3,850 + 4,080) ÷ 3 = 4,047 psi, which passes; (3,850 + 4,080 + 3,560) ÷ 3 = 3,830 psi, which fails.
- ACI, individual tests: the lowest is 3,560 psi, which is 440 psi below 4,000, within the 500 psi limit.
Answer: Both series fail the average-of-three criterion for the last three tests but pass the individual-test criterion; the engineer will investigate.
When strength tests fail
Low cylinder results do not necessarily mean the concrete in the structure is weak; cylinders may have been poorly made, handled or cured. The investigation usually proceeds in steps: review the testing records and field curing conditions; check the structural significance with the engineer, since a small shortfall may still be acceptable for the design; use non-destructive methods such as rebound hammers, ultrasonic pulse velocity or maturity data to identify suspect areas; and drill cores from the structure for testing.
Cores are taken and tested under CSA A23.2-14C, and CSA A23.1 sets acceptance criteria for core strengths, generally that the average of the cores is at least 85 % of \(f'_c\) with no single core below 75 %.
If cores confirm low strength, options include load testing, strengthening, restricting use, or removal and replacement. Contracts typically assign the cost of investigation and correction to the party responsible for the deficiency.
Testing soils and masonry
Soil testing during construction includes in-place density and moisture tests on fill and subgrade (Lesson 4), typically at a specified frequency such as one test per lift for every few hundred square metres of fill or every trench length, with retests after rework; proof-rolling observation; laboratory Proctor tests on each fill material; and geotechnical observation of bearing surfaces, piles and shafts (Lessons 5 and 6). Masonry testing may include mortar and grout specimens, prism tests, unit testing, and inspection of grout placement and reinforcement before cells are closed. In every case, results must be compared promptly with the specified criteria so that defective work is caught before it is buried.
Documentation and nonconformance
Quality records include inspection checklists, test reports, delivery tickets, pour logs, photographs, as-built surveys of footings and piles, maturity records and correspondence. A nonconformance report (NCR) documents work that does not meet requirements, its location and extent, the proposed disposition (use as is, repair, rework or reject), the engineer's approval, and verification that the corrective action was completed. Good documentation turns individual tests into evidence that the work as a whole conforms, and it is often essential in claims, warranty disputes and future renovations.
Capstone: from bare ground to masonry walls
Consider a single-storey commercial building, 30 m by 20 m (about 100 ft by 66 ft), with a slab-on-grade, spread footings and strip footings, a reinforced concrete block exterior wall with brick veneer, on a site with 300 mm (12 in) of topsoil over stiff clay, a groundwater table about 2.5 m (8 ft) down, and a winter start. Review the sequence and the main checks from each lesson:
- Site investigation (Lesson 1): read the geotechnical report for bearing pressures, frost depth, groundwater and recommendations for subgrade and fill.
- Site preparation (Lesson 2): survey control, utility locates, tree protection, erosion and sediment control, stripping and stockpiling topsoil, and proof-rolling the stripped surface.
- Earthwork (Lesson 3): calculate cut, fill and haul volumes with swell and shrink factors; plan protective systems for footing and service trench excavations; plan dewatering if excavations approach groundwater.
- Compaction (Lesson 4): place engineered fill in lifts at the specified moisture, with density tests on every lift, and prepare the granular base and vapour retarder for the slab.
- Shallow foundations (Lesson 5): size checks against the allowable bearing pressure, footings below frost depth, bearing surfaces reviewed and protected from frost, and drainage.
- Deep foundations (Lesson 6): not needed on this stiff clay, but know when soft soils or heavy loads would require piles or ground improvement.
- Concrete (Lesson 7): order mixes with the correct exposure class, strength, air content and maximum aggregate size, and check every ticket.
- Formwork (Lesson 8): engineered forms for the footings and walls, controlled placement rates, stripping by confirmed strength.
- Reinforcement (Lesson 9): bars per shop drawings, correct cover against earth, dowels set for block walls, inspection before concrete.
- Placing and curing (Lesson 10): a pour plan, cold weather protection with heated enclosures and blankets, maturity sensors, joints sawcut on time and curing for the specified period.
- Masonry (Lesson 11): units, mortar type, grout, reinforcement and ties; cold weather protection; bracing and restricted zones; flashings, weeps and movement joints.
- Inspection and testing (Lesson 12): an ITP with hold points, field tests, strength acceptance and documentation.
Working through such a case shows how the materials and methods connect: a mistake in an early stage, such as frozen subgrade or poorly compacted fill, can cause cracking in a slab and masonry walls built months later. The constructor's job is to understand the reasons behind each requirement, plan the work so those requirements can be met, and verify and document that they were.
Many testing agencies now issue results through online portals, and project teams can track strength trends across a whole project. Watching the trend is often more useful than reacting to single results: a gradual decline over several weeks may point to a change in materials or practices that can be corrected before tests begin to fail.
Common mistakes
MistakeJudging acceptance on a single cylinder.
InsteadUse the defined strength test and criteria.
MistakeLeaving cylinders in the sun or freezing on site.
InsteadStore cylinders within the specified temperature range.
MistakeAssuming low cylinders mean weak concrete.
InsteadInvestigate records, use NDT and cores before conclusions.
MistakeCovering work before inspection at hold points.
InsteadRespect hold points in the ITP.
MistakeKeeping poor records of tests and tickets.
InsteadDocument every test, ticket and NCR.
Summary and key terms
- Contractors, testing agencies, engineers and authorities share responsibility for quality.
- An ITP defines inspections, tests, frequencies, criteria and hold points.
- Field tests on fresh concrete include slump, air, temperature and density.
- Cylinder strength equals maximum load divided by area.
- Acceptance uses averages of three tests and limits on individual tests.
- Low results lead to investigation, NDT and cores before any decision.
- Documentation and NCRs prove conformance and resolve problems.
- ITP
- Inspection and test plan.
- Hold point
- Stage where work stops until inspection approval.
- Slump
- Measure of the consistency of fresh concrete.
- Strength test
- Average strength of cylinders from one sample at one age.
- Field-cured cylinder
- Cylinder cured beside the structure to estimate in-place strength.
- Core
- Cylinder drilled from hardened concrete.
- NDT
- Non-destructive testing.
- NCR
- Nonconformance report.
- Special inspection
- Required inspection of critical structural work (US).
- Field review
- Engineer's site review of conformance with design.
Practice problems
Work each problem on paper first, then reveal the answer to check.
Who usually retains the testing agency?
Show answer
The owner.
What does slump measure?
Show answer
Consistency of fresh concrete.
Area of a 150 mm cylinder?
Show answer
About 17,671 mm².
Strength of a 150 mm cylinder failing at 600 kN?
Show answer
About 34 MPa.
Strength of a 6 in cylinder failing at 120,000 lbf?
Show answer
About 4,240 psi.
Name the two parts of strength acceptance.
Show answer
Average of three consecutive tests and individual test limit.
What is the usual core acceptance criterion?
Show answer
Average at least 85 % and no core below 75 % of the specified strength.
What is a hold point?
Show answer
A stage requiring approval before work continues.
Name three quality records.
Show answer
Test reports, tickets, checklists, photographs, NCRs.
Why might an early mistake show up months later?
Show answer
Poor subgrade or fill causes settlement and cracking later.
Lesson quiz · 5 questions
Score 60% or more to complete this lesson.
Create a free account to save your progress, take quizzes and earn a certificate.