
CON-111 · Lesson 9 of 12 · 26 min
Roofing and waterproofing systems
Roofs take the worst of the weather: rain, snow, ice, wind uplift, ultraviolet light, hail, temperature swings of 80 °C or more, foot traffic and rooftop equipment. A leaking roof damages interiors, insulation and structure, disrupts occupants and is one of the most common sources of construction claims. Waterproofing below grade, on plaza decks, balconies and green roofs faces constant water pressure and is buried under finishes, so repairs are extremely expensive. This lesson covers roof slope and drainage, steep-slope roofing such as shingles and metal, low-slope membrane systems, roof insulation and wind uplift, flashings and penetrations, green and blue roofs, below-grade and plaza waterproofing, and the inspection, testing and warranty issues that construction managers manage.
Roof slope and drainage
Roof slope is expressed as rise over run, such as 4:12 (4 in. of rise per 12 in. of run, about 18°) or as a percentage. Roofs are broadly divided into:
- Steep-slope roofs, generally 4:12 or steeper (some products allow down to 2:12 or 3:12 with special underlayment), which shed water by gravity through overlapping units such as shingles, tiles, slate or metal panels. These water-shedding systems are not watertight against standing water.
- Low-slope roofs, generally below 3:12 and often about 2 % (¼ in. per ft), which rely on continuous waterproof membranes. Although called flat roofs, they must still slope to drains or scuppers so that water does not pond.
Drainage design includes roof drains, scuppers through parapets, gutters and downspouts, overflow drains or scuppers that prevent dangerous water build-up if primary drains clog, and crickets (small sloped areas) that direct water around equipment, curbs and the uphill side of chimneys. Ponding water adds weight, can cause progressive deflection and collapse on flexible structures, accelerates membrane deterioration and voids some warranties.
| Slope | Angle | Slope factor | Typical systems |
|---|---|---|---|
| ¼:12 (2 %) | 1.2° | 1.000 | Membranes: modified bitumen, TPO, PVC, EPDM, BUR |
| 2:12 | 9.5° | 1.014 | Standing seam metal, shingles with special underlayment |
| 4:12 | 18.4° | 1.054 | Asphalt shingles, metal, tile |
| 6:12 | 26.6° | 1.118 | Shingles, metal, slate, tile |
| 8:12 | 33.7° | 1.202 | Shingles, slate, tile (steep, fall risk) |
| 12:12 | 45° | 1.414 | Shingles, slate (very steep) |
Steep-slope roofing
Asphalt shingles are the most common roofing on houses in North America: glass fibre mats coated with asphalt and mineral granules, made as three-tab or laminated (architectural) shingles. A shingle roof includes the roof deck, underlayment (felt or synthetic), ice and water protection membrane at eaves and valleys in cold climates, drip edges, starter strips, shingles nailed in the pattern specified by the manufacturer for the wind zone, valley treatments, flashings at walls and chimneys, ridge and hip caps, and ventilation.
Other steep-slope materials include standing seam metal roofing (concealed-fastened panels with raised seams, very durable), exposed-fastener metal panels for agricultural and industrial buildings, clay and concrete tiles, natural and synthetic slate, and wood shakes and shingles.
In Canada, asphalt shingles are manufactured to CSA A123.5 (glass felt shingles) and installed under NBC Part 9 (Section 9.26), which requires eave protection extending from the edge of the roof to at least 900 mm up the roof slope and at least 300 mm inside the inner face of the exterior wall on roofs where ice damming is likely. Low-slope membrane products have their own CSA A123 standards.
Worked problem
Shingle takeoff in squares
A gable house has a roof plan footprint, including overhangs, of 12.0 × 9.0 m (39.4 × 29.5 ft), with a 6:12 slope. Find the roof area, convert to squares (1 square = 100 ft², about 9.29 m²), add 10 % waste for a simple gable roof, and find the number of bundles at 3 bundles per square. Also find the ridge cap length.
Show solution
- Plan area: 12.0 × 9.0 = 108 m² (about 1,162 ft²).
- Slope factor for 6:12: √(1 + 0.5²) = 1.118.
- Roof area: 108 × 1.118 = 120.7 m² (about 1,299 ft²).
- Squares: 1,299 ÷ 100 = 13.0 squares; with 10 % waste: 14.3, so order 14⅓ squares, rounded up to 15 squares.
- Bundles: 15 × 3 = 45 bundles (some estimators order by the bundle: 14.3 × 3 = 42.9, so 43 bundles).
- Ridge cap: the ridge runs the 12.0 m (39.4 ft) length of the house.
Answer: About 120.7 m² (13.0 squares) of roof; order about 43 to 45 bundles plus starter strip, ridge cap for 12 m (39.4 ft), underlayment and eave protection.
Attic ventilation and ice dams
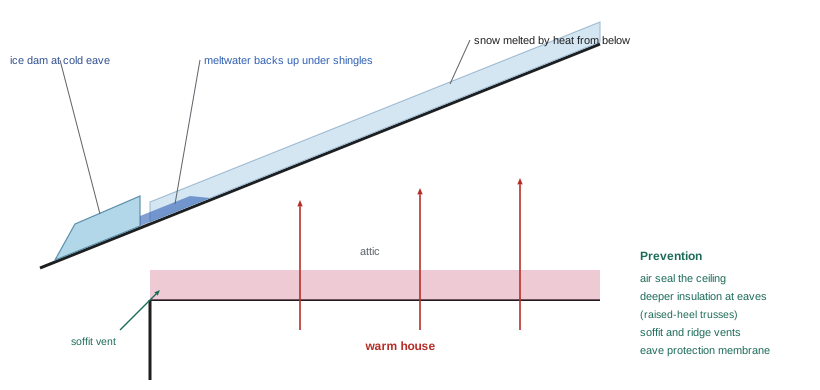
In cold climates, steep-slope roofs over insulated ceilings usually have a ventilated attic. Vents at the eaves (soffit vents) and near the ridge allow outside air to flow through, keeping the roof deck cold and removing moisture. Codes commonly require a net free vent area of about 1/300 of the insulated ceiling area, with balanced intake and exhaust. Ice dams form when heat leaking from the house melts snow on the roof; the meltwater runs down to the cold eaves and refreezes, forming a ridge of ice that backs water up under the shingles. The cure is not more ventilation alone but air sealing the ceiling, adequate insulation (including at the eaves using raised-heel trusses) and ventilation, with eave protection membranes as a backup. Unvented or hot roofs, with insulation at the roof deck, are possible but need careful design of insulation and vapour control (Lesson 6).
Low-slope membrane roofing
Low-slope roofs use continuous membranes. The main families are:
- Built-up roofing (BUR): several plies of felt laminated with hot asphalt or coal tar and surfaced with gravel; durable but labour-intensive and involves hot kettles.
- Modified bitumen (mod-bit): asphalt modified with SBS or APP polymers, in sheets applied by torch, hot asphalt, cold adhesive or self-adhesion, usually in two-ply systems (base and cap sheets). Very common in Canada.
- Single-ply thermoplastics: TPO and PVC sheets with heat-welded seams, often white for reflectivity, mechanically fastened, adhered or ballasted. Very common in the United States.
- Single-ply thermosets: EPDM rubber sheets with taped or adhered seams, durable and economical.
- Fluid-applied and spray polyurethane foam (SPF) roofs, often for re-roofing and complex shapes.
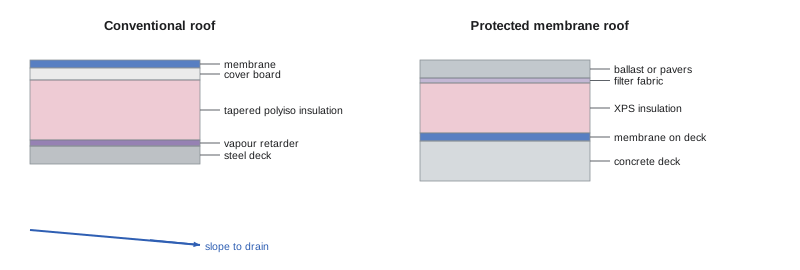
Roof assemblies are described from the deck up: the deck (steel, concrete or wood), a vapour retarder or air barrier where needed, insulation (often tapered to create slope), a cover board such as gypsum or high-density board for protection and fire performance, and the membrane with its flashings. In a protected membrane roof (PMR), also called an inverted roof, the membrane sits directly on the deck and extruded polystyrene insulation is placed above it with ballast or pavers, protecting the membrane from UV, temperature swings and traffic.
Worked problem
Tapered insulation and membrane quantities
A low-slope roof area is 30 × 20 m with a central drain line along the 30 m length, so water drains 10 m to the centre from each side. The tapered insulation slopes at 2 % over a minimum base thickness of 100 mm. What is the maximum insulation thickness at the high edges? If the membrane is supplied in rolls covering 9.3 m² (one square) and side and end laps plus flashings add 15 %, how many rolls of cap sheet are needed?
Show solution
- Rise from drain line to edge: 10 m × 2 % = 0.20 m = 200 mm.
- Maximum thickness: 100 + 200 = 300 mm at the edges (average about 200 mm).
- Roof area: 30 × 20 = 600 m² (about 6,458 ft², 64.6 squares).
- With 15 %: 600 × 1.15 = 690 m²; 690 ÷ 9.3 = 74.2, so 75 rolls.
- Check the insulation's average RSI (about 200 mm average depth) against energy code requirements, which may require a higher minimum thickness.
Answer: About 300 mm (12 in.) at the high edges and about 75 rolls of cap sheet.
Wind uplift, fire and reflectivity
Wind passing over a roof creates suction that tries to peel the membrane and insulation off, strongest at corners and perimeters. Roof assemblies must be designed and installed with fastener or adhesive patterns tested for the required uplift resistance, with closer spacing at corners and edges. Roofs must also meet fire ratings for exterior fire exposure, and in many regions energy codes or green standards call for reflective (cool) roof surfaces or vegetated roofs to reduce heat gain and urban heat islands.
In Canada, wind uplift resistance of membrane roofs is tested to CSA A123.21 (dynamic wind uplift), and wind loads come from NBC Part 4; exterior fire performance is tested to CAN/ULC-S107. Many owners also follow the Canadian Roofing Contractors Association (CRCA) and provincial roofing association guarantee programs.
Flashings and penetrations
Most roof leaks start at flashings: where the membrane meets walls, curbs, parapets, edges, drains and penetrations. Good practice includes base flashings turned up at least 200 mm (8 in.) above the roof surface, counterflashings or reglets to cover the top of base flashings, metal copings over parapets sloped toward the roof, prefabricated boots or sealant pockets for pipes, curbs for mechanical units and skylights, and drains clamped to the membrane. Rooftop equipment should be grouped on curbs or raised supports to leave room for flashing and maintenance, and later penetrations added by other trades must be flashed by the roofer to protect the warranty.
Green roofs and blue roofs
Vegetated (green) roofs add a root barrier, drainage layer, filter fabric, growing medium and plants over a waterproofing membrane, usually a protected membrane assembly. They reduce stormwater runoff, cool the roof, provide amenity space and extend membrane life, but add significant weight (from about 50 kg/m² for thin extensive systems to several hundred for intensive gardens), require irrigation and maintenance, and make leak finding difficult. Some cities, such as Toronto, require green roofs on larger new buildings. Blue roofs temporarily store rainwater with flow-control drains to reduce peak stormwater flows. Electronic leak detection, using electric field vector mapping or similar methods, can locate breaches in membranes under overburden.
Below-grade and plaza waterproofing
Below-grade walls and slabs that enclose occupied spaces need waterproofing that resists hydrostatic pressure, not just dampproofing, which only resists soil moisture. Options include sheet membranes, fluid-applied membranes, bentonite clay panels, crystalline admixtures and coatings, and blindside (pre-applied) membranes placed against shoring before concrete is cast where there is no access to the outside of the wall. Drainage boards and perimeter drains relieve water pressure. Plaza decks, podium roofs, balconies and parking decks over occupied space use hot rubberized asphalt or other robust membranes, protection boards, drainage, insulation and wearing surfaces such as pavers or concrete toppings. Since these membranes are buried, flood testing (ponding water for 24 to 72 hours) or electronic leak detection before covering is strongly recommended.
Inspection, testing and warranties
Construction managers protect roofing quality by holding a preroofing conference with the roofer, designer, manufacturer and trades that will work on the roof; confirming deck readiness (dry, clean, properly attached); checking weather limits for adhesives and torches; enforcing hot-work permits and fire watch for torch-applied systems; inspecting fastener patterns, seams (probing heat-welded seams and cutting test samples), flashings and terminations; and arranging manufacturer inspections required for warranties. Roof warranties vary: the contractor's workmanship warranty (often two to five years), and manufacturer warranties from material-only to full system no-dollar-limit warranties of 15 to 30 years, which require manufacturer-approved installers and inspections. Protecting the finished roof from damage by other trades, with walkway pads and boards for equipment installation, is essential.
Re-roofing and roof maintenance
Many roofing projects are replacements on occupied buildings. Re-roofing adds challenges: protecting occupants and interiors from leaks and fumes, removing the old roof safely (sometimes with asbestos-containing materials that need abatement), checking the deck for corrosion or rot, and keeping the building watertight at the end of each day with temporary tie-ins. Regular inspection and maintenance, such as clearing drains, repairing small defects and re-sealing flashings, greatly extends roof life.
Common mistakes
MistakeDesigning flat roofs with no slope.
InsteadSlope membranes to drains, about 2 % minimum.
MistakeFixing ice dams with more ventilation alone.
InsteadAir seal and insulate the ceiling, then ventilate.
MistakeLetting other trades cut in penetrations after roofing.
InsteadHave the roofer flash all penetrations.
MistakeCovering plaza membranes without testing.
InsteadFlood test or use electronic leak detection first.
MistakeTorching membranes without hot-work controls.
InsteadUse hot-work permits and a fire watch.
Summary and key terms
- Steep-slope roofs shed water; low-slope roofs need continuous membranes.
- Slope factors convert plan area to roof area; 1 square = 100 ft².
- Ice dams are prevented by air sealing, insulation, ventilation and eave protection.
- Low-slope systems include BUR, modified bitumen, TPO, PVC, EPDM and SPF.
- Wind uplift is tested to CSA A123.21 in Canada and FM or UL methods in the US.
- Flashings at walls, curbs, edges and penetrations cause most leaks.
- Buried waterproofing needs testing before cover; warranties need approved installers.
- Square
- 100 ft² (about 9.29 m²) of roof area.
- Slope factor
- Multiplier converting plan area to sloped roof area.
- Underlayment
- Layer under shingles providing secondary protection.
- Eave protection
- Membrane at eaves preventing ice-dam leaks.
- Ice dam
- Ridge of ice at eaves that backs up meltwater.
- Modified bitumen
- Polymer-modified asphalt membrane.
- TPO
- Thermoplastic polyolefin single-ply membrane.
- Protected membrane roof
- Inverted roof with insulation above the membrane.
- Cricket
- Small sloped area diverting water around obstructions.
- Flood test
- Ponding water on a membrane to check for leaks.
Practice problems
Work each problem on paper first, then reveal the answer to check.
What is the slope factor for 4:12?
Show answer
About 1.054.
How many m² in one roofing square?
Show answer
About 9.29 m².
Roof area of 150 m² plan at 6:12?
Show answer
About 168 m².
Squares for 2,000 ft² of roof plus 10 %?
Show answer
22 squares.
What causes ice dams?
Show answer
Heat leaking from the house melting snow that refreezes at cold eaves.
Name two single-ply membranes.
Show answer
TPO, PVC, EPDM.
What is a protected membrane roof?
Show answer
Insulation is placed above the membrane.
Where is wind uplift strongest?
Show answer
At corners and perimeters.
What is the difference between waterproofing and dampproofing?
Show answer
Waterproofing resists hydrostatic pressure; dampproofing resists soil moisture only.
What is required for manufacturer system warranties?
Show answer
Approved installers and manufacturer inspections.
Lesson quiz · 5 questions
Score 60% or more to complete this lesson.
Create a free account to save your progress, take quizzes and earn a certificate.