
CON-315 · Lesson 9 of 12 · 23 min
Sequencing the work
A schedule says what happens and when. Sequencing is the detailed order of work within an area or an operation: which strip of a slab is poured first, where construction joints go, when shores can be removed, which trade goes into a room first, and how the building is closed in so that interior work can start. Good sequencing keeps crews working, protects completed work and avoids traps where one trade blocks another. Field engineers contribute to sequencing because many sequencing decisions depend on technical details: concrete behaviour, structural support during construction, tolerances and the needs of the next trade. This lesson covers pour sequences and construction joints, the sequence of stripping, stressing and reshoring, the sequence of envelope and dry-in, and the order of interior rough-in. CON-210 covered schedules and CPM, CON-335 covers short-interval planning and trade coordination, and CON-325 covers temporary works.
Pour sequences and construction joints
A large slab or wall cannot always be placed in one continuous pour. The size of a pour is limited by the concrete supply, the pumping rate, the finishing crew, the weather and the hours available. Where a pour must be split, the designer or the contractor, with the designer's approval, chooses the locations of construction joints. Joints are usually placed where shear is low, often near the middle third of spans, and detailed with keyways, continuous reinforcing and sometimes waterstops. Construction joints in post-tensioned slabs need special attention because tendons must be anchored or coupled at the joint.
A cold joint is an unplanned joint that forms when fresh concrete is placed against concrete that has already begun to set. Cold joints can weaken a member, leak water and look poor. They usually happen because something interrupted the pour: a pump breakdown, a late truck, a finishing crew that cannot keep up, or simply a pour that was too big for the resources. A field engineer planning a pour therefore asks whether the placement can be continuous and what happens if it is interrupted.
The level 3 transfer slab of Larkspur Commons is the largest pour on the project. The example asks whether it can be placed in one continuous pour.
# Can the level 3 transfer slab be poured in one placement without cold joints? (metric, illustrative)
area = 62.4 * 39.0                 # slab area, m2
thickness = 0.30                   # m (average, including drops)
volume = area * thickness
pump_rate = 55                     # m3 per hour, sustained (trucks, pump and finishing crew)
trucks_per_hour = pump_rate / 8    # 8 m3 trucks
hours = volume / pump_rate
print(f"Volume {volume:.0f} m3, about {hours:.1f} h of placing at {pump_rate} m3/h ({trucks_per_hour:.1f} trucks per hour)")
# Concrete must be placed against the previous concrete before it begins to set.
working_time = 2.5                 # hours before placed concrete can no longer be blended (mix and weather dependent)
strip_width = 8.0                  # m, width of the strip the pump works across the slab
strip_area = strip_width * 39.0
minutes_per_strip = strip_area * thickness / pump_rate * 60
print(f"Each {strip_width:.0f} m strip takes {minutes_per_strip:.0f} min; the edge waits about that long before new concrete meets it")
print("Cold joint risk low" if minutes_per_strip / 60 < working_time else "Cold joint risk: plan a construction joint")
# What if the pump breaks down for 90 minutes?
delay = 1.5
print(f"With a {delay:.1f} h breakdown the exposed edge waits {minutes_per_strip/60 + delay:.1f} h -> "
f"{'still OK' if minutes_per_strip/60 + delay < working_time else 'cold joint likely: have a standby pump or a planned joint location'}")Volume 730 m3, about 13.3 h of placing at 55 m3/h (6.9 trucks per hour) Each 8 m strip takes 102 min; the edge waits about that long before new concrete meets it Cold joint risk low With a 1.5 h breakdown the exposed edge waits 3.2 h -> cold joint likely: have a standby pump or a planned joint location
The slab could in principle be placed in one pour of about 13 hours, and under normal conditions the exposed edge of each strip meets new concrete well within the working time. But a 13-hour pour is long for one finishing crew and leaves no margin: a 90-minute pump breakdown would probably create a cold joint in the middle of the transfer slab. After discussion with the structural engineer and the post-tensioning designer, Thornbury splits the slab into two pours with a planned construction joint near the third point of the spans along grid 5, with coupled tendons, and keeps a standby pump on call for each pour. Each pour is then about seven hours, which the crew can handle with margin for delays.
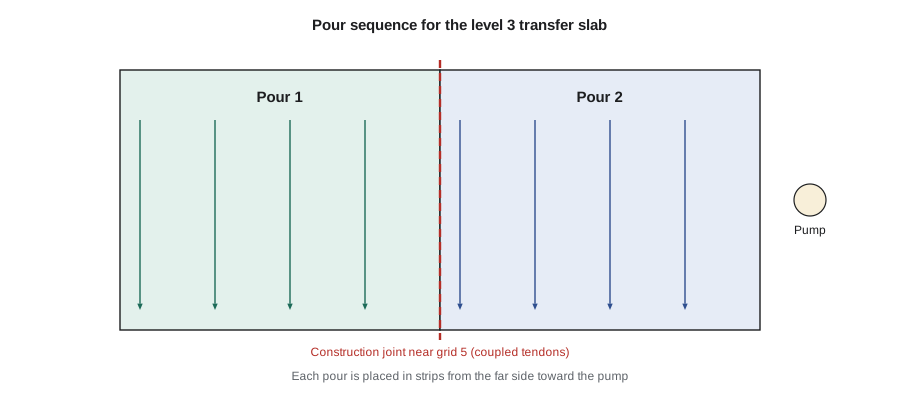
The direction of placement matters too. Concrete is normally placed starting at the point farthest from the pump and working back, so that the pump line can be shortened as the pour proceeds and finishers never have to walk across fresh concrete to reach the next strip. Hot weather shortens working time and may require retarders, cooler concrete or night pours; cold weather requires heating and protection. The concrete supplier and the testing agency are part of planning any large pour.
Stripping, stressing and reshoring
Concrete gains strength over days and weeks. Formwork can be stripped only when the concrete is strong enough to carry its own weight and any construction loads, and post-tensioned slabs can be stressed only when the concrete has reached the strength shown on the post-tensioning drawings. The sequence of pouring, stressing, stripping, reshoring and loading the next level is therefore controlled by concrete strength, and it determines the floor cycle (lesson 5).
Reshores are props installed under a slab after the original forms and shores are removed, to share the weight of fresh concrete and construction loads above with the slabs below. The temporary works designer specifies the shoring and reshoring sequence, including how many levels of reshores are needed and when they can be removed. CON-240 introduced formwork and shoring, and CON-325 covers temporary works planning. The field engineer's role is to track concrete strengths, record pour dates and stressing dates, and make sure that the actual sequence follows the design.
Strength gain depends on the mix, the curing conditions and the temperature. Designers and contractors often use approximate models to plan dates, then confirm with field-cured cylinder tests or with in-place methods such as maturity sensors. The example uses a common approximation to estimate when the transfer slab will reach the strength required for stressing.
# When can the transfer slab tendons be stressed and the forms stripped? (illustrative strength-gain model)
f28 = 35.0                        # specified 28-day strength, MPa
stress_at = 20.0                  # strength required before stressing, per the post-tensioning drawings
a, b = 4.0, 0.85                  # constants of a common strength-gain approximation for moist-cured concrete
def strength(t):                  # t in days
    return f28 * t / (a + b * t)
for t in (1, 2, 3, 4, 5, 7, 14, 28):
    print(f"Day {t:2d}: about {strength(t):4.1f} MPa")
day = next(t for t in range(1, 29) if strength(t) >= stress_at)
print(f"Earliest day the model predicts {stress_at} MPa: day {day} (confirm with field-cured cylinder tests before stressing)")Day 1: about 7.2 MPa Day 2: about 12.3 MPa Day 3: about 16.0 MPa Day 4: about 18.9 MPa Day 5: about 21.2 MPa Day 7: about 24.6 MPa Day 14: about 30.8 MPa Day 28: about 35.3 MPa Earliest day the model predicts 20.0 MPa: day 5 (confirm with field-cured cylinder tests before stressing)
The model suggests the slab will reach the 20 MPa stressing strength on about day 5. Thornbury plans the stressing for day 5 or 6, but the decision is made on test results, not on the model. Field-cured cylinders or maturity sensors embedded in the slab tell the team when the concrete has actually reached the required strength. In cold weather, strength gain can be much slower, and the model's predictions would be unsafe without confirmation.
Maturity sensors have become common on building sites. They record the temperature history of the concrete, which, combined with a calibration for the specific mix, gives an estimate of in-place strength following standard practice. They can shorten floor cycles by showing when concrete is ready, but the calibration must be done properly and the results confirmed by tests as the specification requires.
| Event | Controlled by | Field engineer records |
|---|---|---|
| Pour | Readiness checks and pour card | Date, time, weather, volume, any interruptions |
| Stressing | Concrete strength per post-tensioning drawings | Test results, stressing date, elongation records from the supplier |
| Stripping forms | Strength and the temporary works design | Date and area stripped |
| Installing reshores | Temporary works design | Layout and date installed |
| Pouring the level above | Reshore design and strength of supporting slabs | Date and confirmation that reshores are in place |
| Removing reshores | Temporary works design | Date and area; confirmation of strength |
Transfer to wood frame
At Larkspur Commons, the sequence changes when the podium is complete. The wood-frame storeys cannot start until the transfer slab is stressed, the shores and reshores below it are removed or no longer needed, the hold-down couplers are surveyed and the podium roof waterproofing at the base of the walls is installed or protected. The field engineer coordinates these conditions so that the framer can start on time. A checklist for the transition, agreed in advance with the superintendent and the framer, prevents the common situation where framing starts while a key condition is missing and work later has to be undone.
Envelope and dry-in
Interior finishes cannot start until the building is dry-in, meaning protected from rain and snow. Dry-in sequencing is one of the most important decisions on a mid-rise wood building, because wood framing, sheathing and many interior materials are damaged by prolonged wetting, and wet framing increases shrinkage and the risk of mould. In the Okanagan climate, winters are cooler and wetter than summers, so Thornbury plans to reach dry-in on the wood-frame storeys before the wettest months.
A typical sequence for each wood-frame storey is framing and sheathing, roof or temporary protection above, sheathing membrane, windows installed and flashed, then cladding. The roof is critical: until it is on, rain can reach every floor below. Many projects install a temporary roof or a weather protection membrane on each floor deck to shed water, and some protect the whole building with temporary enclosures. The field engineer supports dry-in by checking rough openings before windows arrive, setting out flashing and transition details, and recording the moisture content of framing before it is closed in, because many specifications set a maximum moisture content before insulation and drywall.
Interior rough-in sequence
Inside each floor, trades must work in an order that lets each one complete its work without damage from the next. A typical order for a residential floor in wood frame is: framing complete and inspected; plumbing rough-in, especially drain lines which are the least flexible; sprinkler rough-in; heating and ventilation ducts; electrical and low-voltage rough-in; fire stopping of penetrations; inspections; insulation; and drywall. The order varies, but some rules are consistent: the trades with the largest and least flexible services go first, inspections and fire stopping must happen before walls are closed, and every penetration of a rated assembly must be sealed correctly.
Sequencing conflicts are common in tight wood-frame buildings. On Larkspur Commons, corridor bulkheads hold the sprinkler main, the ventilation duct and cable trays. If the electrician installs trays first, the sprinkler fitter cannot fit the main. The constructability review (lesson 8) found the bulkhead depth problem; sequencing now decides the order of installation in the remaining space: sprinkler main first, then duct, then trays, with each trade's position marked on the framing by the field engineer from the coordinated model.
Short-interval planning, such as weekly work plans and three-week look-ahead schedules, turns these sequences into daily work. CON-335 covers trade coordination and short-interval planning, and CON-410 covered the Last Planner System. The field engineer's contribution is technical: layout ready before each trade starts, coordination drawings that show the order and positions of services, and checks before walls are closed.
Location-based sequencing and takt
Multi-storey residential buildings repeat the same work floor after floor. Location-based scheduling and takt planning sequence trades through the building as a train: each trade moves through the same areas in the same order at a steady rhythm. For the field engineer, this means layout and checks must also move at the takt rhythm, one area ahead of each trade. A field engineer who falls behind the takt holds up every trade behind the late area. CON-210 and CON-410 covered these methods.
Protecting completed work
Sequencing includes protection. Finished concrete floors need protection from hydraulic oil and rust stains; installed windows need protection from other trades' scaffolds and lifts; finished stairs need temporary treads; elevator doors need covers. The field engineer often helps plan protection where it affects layout marks and survey points, for example protecting working benchmarks and control marks from being covered by floor protection, and transferring them onto columns or walls before floors are covered.
Common mistakes
MistakePlanning a large pour without considering interruptions.
InsteadCheck whether placement can be continuous, plan joint locations with the designer and keep a backup for pumps and supply.
MistakeStressing or stripping on the date predicted by a model.
InsteadUse the model to plan, but decide on field-cured tests or calibrated maturity data.
MistakeRemoving reshores early to free materials for the next level.
InsteadFollow the temporary works design for reshore removal and confirm strengths.
MistakeStarting interior work before the floor is dry-in.
InsteadSequence envelope work so that each floor is protected before moisture-sensitive materials go in.
MistakeLetting the first trade to arrive take the best space in a crowded bulkhead.
InsteadSet the installation order from the coordinated model and mark positions for each trade.
Summary and key terms
- Sequencing is the detailed order of work within areas and operations, and it depends on technical details.
- Pour size is limited by supply, pumping, finishing and weather; planned construction joints need the designer's approval.
- Cold joints form when placement is interrupted; plan for interruptions with backup resources and joint locations.
- Stripping, stressing and reshoring follow concrete strength and the temporary works design.
- Strength models help planning, but decisions rest on field-cured tests or calibrated maturity data.
- Dry-in protects wood framing and interior materials, so envelope sequencing is critical in wet seasons.
- Interior rough-in follows a logical order, with least flexible services first and inspections before closing walls.
- Layout and checks must stay ahead of each trade in repetitive, location-based sequences.
- Sequencing
- The detailed order of work within an area or operation.
- Construction joint
- A planned joint between separate concrete placements, detailed to transfer forces.
- Cold joint
- An unplanned joint formed when fresh concrete is placed against concrete that has begun to set.
- Reshore
- A temporary prop installed under a slab after stripping to share loads from levels above.
- Stressing
- Tensioning post-tensioning tendons once the concrete reaches the required strength.
- Maturity method
- Estimating in-place concrete strength from its temperature history and a mix-specific calibration.
- Dry-in
- The stage at which a building or floor is protected from rain and snow.
- Takt
- A steady work rhythm in which trades move through repeated areas in sequence.
Practice problems
Work each problem on paper first, then reveal the answer to check.
Why are construction joints often placed near the third points of spans?
Show answer
Shear is usually low there; the designer must approve locations.
What causes cold joints?
Show answer
Interruptions in placement, such as pump breakdowns, late trucks or pours too large for the resources.
In the transfer slab example, why was the slab split into two pours?
Show answer
A single 13-hour pour left no margin; a pump breakdown would probably cause a cold joint.
When did the model predict the slab would reach stressing strength, and what confirms it?
Show answer
About day 5; field-cured cylinder tests or calibrated maturity sensors confirm it.
Name three conditions that must be met before framing starts on the podium.
Show answer
Transfer slab stressed, shoring and reshores no longer needed, hold-down couplers surveyed, podium roof waterproofing installed or protected.
Why does dry-in matter so much for wood buildings?
Show answer
Prolonged wetting damages wood and interior materials, increases shrinkage and the risk of mould.
Which services usually go first in interior rough-in, and why?
Show answer
Drain lines and large, inflexible services, because they have the least flexibility in routing.
How should the order of installation in a crowded bulkhead be decided?
Show answer
From the coordinated model, with positions marked for each trade.
Lesson quiz · 5 questions
Score 60% or more to complete this lesson.
Create a free account to save your progress, take quizzes and earn a certificate.