
PHOT-310 · Lesson 4 of 12 · 29 min
Lighting products: quality, falloff and gradients
Lighting is the heart of product photography. A product has no expression and no gesture; everything the viewer feels about it, its shape, its material, its quality and its price, comes from the way light describes it. A cheap plastic bottle and an expensive perfume flacon differ in the image mostly in how their highlights, gradients and edges are drawn. PHOT-220 introduced the qualities of light, modifiers and lighting ratios. This lesson applies those ideas to products: how to read a product's surfaces, how to use the size and distance of a source to create soft or hard light, how the inverse square law controls falloff across products and backgrounds, how to calculate flash power and aperture changes, and how to build the smooth gradients that make products look three-dimensional.
Reading the product
Before placing any lights, study the product. Every product is a combination of surfaces that respond to light in different ways:
- Diffuse (matte) surfaces such as paper, unglazed ceramic, fabric and matte plastic scatter light in all directions. Their brightness depends mostly on the angle of the light to the surface and on the light's intensity, not on the camera position. They show texture and form through shading and shadows.
- Specular (glossy or mirror-like) surfaces such as chrome, polished metal, gloss paint, glass and glossy plastic reflect light at the same angle it arrives. They do not show the light source's intensity so much as its shape: you see a reflection of the light source itself, or of whatever is in the right position. Lighting a specular surface means deciding what it reflects.
- Mixed surfaces such as satin finishes, brushed metal and many plastics have both a diffuse and a specular component. They show shading and also broad, soft reflections.
- Transparent and translucent materials such as glass, liquids, frosted plastic and gemstones transmit, refract and reflect light; they are covered in lesson 5.
Most products combine several of these: a bottle may have a glossy glass body, a matte paper label, a metal cap and a liquid inside. The lighting must work for all of them at once, or the photographer must light each part separately and combine frames, a common commercial technique.
Ask also what the product needs to communicate. Is it about shape (a sculptural speaker), texture (a knitted sweater), material quality (a brushed aluminum laptop), freshness (a salad) or precision (a watch)? The answer guides the choice between soft and hard light, broad and narrow highlights, and high or low contrast.
Soft and hard light on products
The apparent size of a light source, as seen from the product, determines whether its light is soft or hard. A source that is large relative to its distance from the product produces soft light with gradual shadow edges and broad highlights; a small or distant source produces hard light with sharp shadows and small, bright highlights.
Soft light is the default for most product work because it describes form gently, minimizes harsh reflections and produces clean shadows that are easy to control. A large softbox or diffusion scrim above and slightly behind a product, with fill from white cards in front, is a classic starting point for many objects. Hard light is used deliberately for drama, to show texture, to create crisp shadows as graphic elements, or to make glassware sparkle. Many product images combine both: a soft overall key with a small hard accent to add sparkle or rim definition.
On specular products, source size also controls the size of the highlight. A large softbox reflected in a glossy phone screen produces a large, even reflection; a small light produces a small hot spot. Because the reflection shows the source's shape, the shape of the modifier matters: round modifiers produce round highlights, strip boxes produce long line highlights, and a scrim with crisp edges produces a highlight with crisp edges. Many product photographers prefer rectangular sources for their clean, architectural reflections.
The inverse square law
For a small source, the illuminance on a surface falls with the square of the distance from the source. Doubling the distance spreads the same light over four times the area, so the illuminance falls to a quarter, a loss of two stops.
In stops, the change is:
The law is exact only for point sources, but it is a useful approximation for softboxes once the distance is more than about the size of the source. Very close to a large softbox, light falls off more slowly than the law predicts.
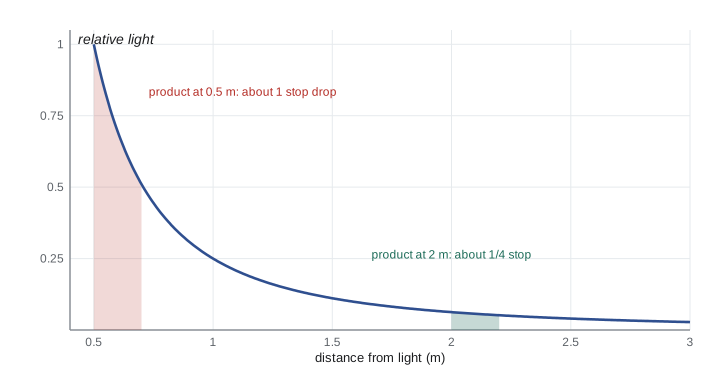
For product photographers, the inverse square law has three practical consequences.
- Falloff across the product. When the light is close, the part of the product nearest the light is much brighter than the far part. A close light creates rapid falloff, which can add drama and shape; a distant light gives even illumination across the product.
- Background control. Moving the product further from the background, or the light closer to the product, darkens the background relative to the product. Moving the light back evens out product and background. This is how photographers turn a white background gray or a gray background black without changing paper.
- Exposure changes. Moving a light changes exposure predictably, which lets photographers adjust without metering every change.
Worked problem
Falloff across a product
A 20 cm deep product is lit from the front-side by a softbox whose front edge is 0.5 m from the nearest part of the product. How much darker is the far side, in stops? Repeat for the softbox moved to 2 m.
Show solution
- At 0.5 m: ratio = (0.5 / 0.7)² ≈ 0.51; stops = 2 × log₂(0.714) ≈ −0.97, about one stop darker.
- At 2 m: ratio = (2.0 / 2.2)² ≈ 0.83; stops = 2 × log₂(0.909) ≈ −0.28, about a quarter of a stop darker.
Answer: About one stop of falloff with the light at 0.5 m, against about a quarter stop at 2 m. Use the close position for shape and drama, the distant one for evenness, and remember that the distant light is also harder unless it is larger.
There is a trade-off. Moving a softbox back gives more even light but makes the source smaller relative to the product, so the light becomes harder and the highlights smaller. To keep the light both soft and even, photographers use larger sources further away, such as a big scrim at 2 m rather than a small softbox at 0.5 m.
Flash power and aperture arithmetic
Commercial product work often needs small apertures for depth of field, so photographers must calculate how much light is needed. Each stop of aperture halves or doubles the light reaching the sensor. The f-number sequence f/2.8, f/4, f/5.6, f/8, f/11, f/16, f/22 is in steps of one stop, each a factor of √2 apart. The light needed scales with the square of the f-number:
Here \(P\) is flash power, \(N\) the f-number and \(d\) the light distance, at constant ISO. Strobe power is often expressed in watt-seconds (joules) or as stops on a scale where each step doubles the output, for example a power setting from 1 to 10 where each whole number is one stop.
Worked problem
Gaining depth of field with more power
A product is correctly exposed at f/8, ISO 100, with a strobe set to 1/8 power and the softbox 1 m away. The photographer needs f/16 for depth of field and also wants to move the softbox back to 1.4 m for more even light. What power is needed?
Show solution
- f/8 to f/16 is two stops: power must increase by (16/8)² = 4 times.
- 1 m to 1.4 m is about one stop: power must increase by (1.4/1)² ≈ 2 times.
- Total increase: 4 × 2 = 8 times, three stops.
- 1/8 power × 8 = full power.
Answer: Full power. If the strobe is already at maximum or the flash duration at full power is too long, alternatives include raising ISO to 200, using a more efficient modifier, or bringing the light back to 1 m and accepting more falloff.
Continuous lights follow the same arithmetic, but the variable is usually shutter speed or ISO rather than power. A static product on a stand can be photographed with a long shutter speed, so continuous light can still allow small apertures; the limits are vibration, ambient light contamination and, for living subjects or food, movement.
Highlights, shadows and contrast
A useful way to plan product lighting is to think of each light as having one of a few jobs:
- Key light: the main source that establishes direction and mood, often large and soft, frequently above or behind the product for glossy objects.
- Fill: light or reflection that opens up shadows. In product work, fill often comes from white cards close to the product rather than from separate lights.
- Accent or kicker: a small or narrow source that adds a highlight or rim to separate an edge, show a texture or add sparkle.
- Background light: illumination for the background, controlled separately to set its tone or gradient.
- Negative fill: black cards that deepen shadows and add contrast or define edges on glossy surfaces.
Shadows deserve attention. Under a large overhead source, a product casts a soft contact shadow that grounds it on the surface. On white backgrounds, e-commerce clients may want a soft drop shadow, a reflection, or no shadow at all (often achieved by shooting on an underlit translucent table or by removing the shadow in post). The shadow's direction and softness should be consistent across a product range.
Gradients and the illusion of form
A gradient is a smooth transition of tone across a surface, from bright to dark. Gradients are what make a product look rounded, solid and real in a two-dimensional image. A cylinder lit evenly from all sides looks flat; the same cylinder with a highlight on one side fading to shadow on the other looks round. On glossy products, gradients come from the reflection of a light source that is itself graduated, or from a large diffuser that is brighter in the middle than at the edges.
Photographers create gradients in several ways:
- Feathering a light: aiming a softbox so that the product receives light from the edge of the beam rather than the center, producing gradual falloff across the product.
- Graduated diffusion: placing a light close behind one part of a scrim so that the scrim glows brightly in one area and fades toward its edges. Reflected in a glossy product, the scrim appears as a smooth gradient.
- Distance and inverse square: putting the light close to one end of the product so that falloff creates a gradient along it.
- Background gradients: aiming a grid spot or softbox at part of the background, so that it fades from light behind the product to dark at the edges, which separates the product and focuses attention.
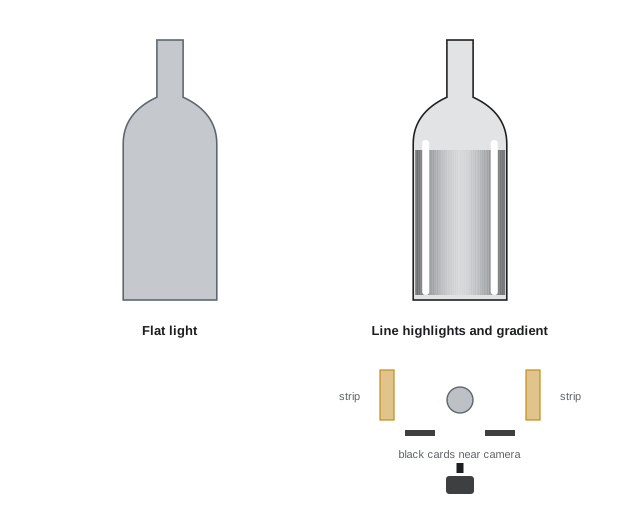
Gradients on glossy products must be smooth and free of distractions. A reflection of a stand, a seam in the scrim or a crease in the diffusion material will appear in the product and require retouching. Many studios keep large frames of clean diffusion fabric and acrylic specifically for creating flawless gradients.
The family of angles
For specular surfaces, there is a range of light source positions that will produce a reflection visible to the camera. This is sometimes called the family of angles: the set of positions from which light would reflect off a glossy surface into the lens, following the rule that the angle of reflection equals the angle of incidence. A light placed inside the family of angles appears as a reflection in the surface; a light outside it does not reflect into the lens at all, so the surface appears dark or shows reflections of whatever else is within the family.
This idea explains many product lighting decisions. To make a flat glossy surface such as a phone screen or a sheet of black acrylic appear bright and even, place a large, even source within its family of angles. To make it look deep black, ensure that only black cards or darkness are within the family. To show the shape of a curved chrome object, which has a very wide family of angles, surround it with carefully controlled white and black areas, because its surface reflects almost the whole room. Lesson 5 develops this for reflective, transparent and dark products.
| Lighting goal | Technique | Effect |
|---|---|---|
| Even light across the product | Large source, further away | Less falloff, soft light preserved |
| Drama and shape | Light close and feathered | Rapid falloff, strong gradient |
| Darker background | Increase product-to-background distance | Background falls off |
| Line highlights on cylinders | Strip boxes behind and to the sides | Defined edges, rounded form |
| Deep black glossy surfaces | Keep the family of angles dark | No reflections of light sources |
| Texture on matte surfaces | Hard light at a grazing angle | Shadows reveal surface detail |
Common mistakes
MistakePlacing lights before studying the product's surfaces.
InsteadIdentify diffuse, specular, mixed and transparent parts first.
MistakeMoving a small softbox back for even light and wondering why it became harsh.
InsteadUse a larger source further away to keep light both soft and even.
MistakeGuessing exposure after changing aperture and distance.
InsteadCalculate power changes from f-number and distance ratios.
MistakeLeaving creases and stands visible in glossy reflections.
InsteadUse clean diffusion and check reflections at full magnification.
MistakeLighting a chrome object with one softbox and nothing else.
InsteadControl everything within its family of angles with white and black cards.
Summary and key terms
- Products combine diffuse, specular, mixed and transparent surfaces that need different lighting.
- Source size relative to distance determines soft or hard light and highlight size.
- The inverse square law controls falloff across the product and background.
- Required power scales with the square of the f-number and of light distance.
- Key, fill, accent, background and negative fill each have distinct jobs.
- Gradients create the illusion of form and are built by feathering, graduated diffusion and distance.
- The family of angles determines what a glossy surface reflects into the lens.
- Diffuse surface
- A surface that scatters light in all directions.
- Specular surface
- A mirror-like surface reflecting at equal angles.
- Inverse square law
- Illuminance falls with the square of distance from a point source.
- Falloff
- Decrease of light level with distance.
- Feathering
- Using the edge of a light's beam for gradual light.
- Gradient
- A smooth transition of tone across a surface.
- Negative fill
- Black surfaces used to deepen shadows or define edges.
- Family of angles
- Source positions that produce a reflection visible to the camera.
- Line highlight
- A narrow highlight from a strip source on a curved surface.
- Watt-second
- A unit of flash energy equal to one joule.
Practice problems
Work each problem on paper first, then reveal the answer to check.
Light distance doubles. Change in stops?
Show answer
Two stops less light.
1 m to 1.4 m in stops?
Show answer
About one stop less.
f/5.6 to f/11 needs how much more power?
Show answer
Four times, two stops.
Falloff across 10 cm with the light at 0.4 m?
Show answer
(0.4/0.5)² = 0.64, about 0.64 stop.
How do you darken a white background without changing paper?
Show answer
Move the product further from it or the light closer to the product.
What does a glossy surface show of a light?
Show answer
Its shape, as a reflection.
What creates line highlights?
Show answer
Strip boxes.
How do you make black acrylic look deep black?
Show answer
Keep only black within its family of angles.
What is feathering?
Show answer
Lighting with the edge of the beam.
Name a cause of retouching on glossy products.
Show answer
Reflections of stands or creased diffusion.
Lesson quiz · 5 questions
Score 60% or more to complete this lesson.
Create a free account to save your progress, take quizzes and earn a certificate.