
PHOT-310 · Lesson 5 of 12 · 29 min
Reflective, transparent and dark products
Some products are notoriously difficult to photograph: polished metal that reflects the whole studio, glass that is almost invisible, liquids that turn muddy, black products that disappear into black backgrounds and white products that vanish on white. These are also the products clients most often bring to specialists, because they cannot be photographed well with simple setups. Whisky and perfume bottles, watches, jewelry, cookware, smartphones, cosmetics packaging and electronics all depend on precise control of reflections and edges. This lesson applies the family of angles from lesson 4 to the hardest product surfaces and explains the classic techniques of bright-field and dark-field glass lighting, tenting and sweeping for metal, liquid lighting, and separation for black-on-black and white-on-white products.
Why reflective products are difficult
A mirror-like surface does not have a color or brightness of its own in the way a matte surface does. What the camera sees in a chrome kettle, a polished watch case or a glossy black phone is a reflection of the surroundings. A curved reflective surface reflects a very wide view, sometimes almost a hemisphere, so lights, stands, the camera, the photographer and the studio ceiling may all appear in it. The photographer's task is therefore to design the environment that the product reflects: to place white areas where highlights should appear, black areas where the surface should look dark and defined, and to remove everything else.
The basic rule is that a reflective surface will look as bright as whatever it reflects. A softbox reflected in a chrome surface appears as a white shape; a black card reflected appears as a dark area. The visual quality of a reflective product, its sense of form, polish and luxury, comes from the arrangement of these light and dark shapes. Viewers read alternating bands of white and dark as shiny metal; a uniformly bright or uniformly dark surface looks flat or reads as plastic.
Metal and chrome
Several techniques help with metal and chrome:
- Large scrims and sweeps: place a large diffusion panel or a curved sheet of white material where the reflection should appear, lit evenly from behind. The surface shows a clean white reflection with smooth edges.
- Graduated reflections: light the scrim unevenly so that its reflection shows a smooth gradient, giving a sense of curvature and polish.
- Black cards for definition: place black cards or flags where dark lines should appear along the edges or the center of a curved surface. These define the product's shape and stop it looking flat.
- Tenting: surround a small product with a tent of white diffusion material, leaving only a small hole for the lens. The product then reflects mostly even white, with only the lens opening visible as a dark spot that can be removed or disguised. Tenting is quick and effective for jewelry and small polished items but can look bland, so black strips are often added inside the tent.
- Hiding the camera: use a longer lens to reduce the camera's size in the reflection, shoot through a hole in a black or white card, angle the product so that the camera reflection falls off the visible surface, or remove the camera reflection in post.
- Polarization: a polarizing filter can reduce reflections from non-metallic surfaces such as glass, painted surfaces and plastics, but it has little effect on reflections from bare metal, which do not polarize light in the same way. Cross-polarization, with polarizing gels on the lights and a polarizer on the lens, can remove almost all specular reflection from non-metallic subjects, useful for documenting artwork or showing true color of glossy packaging.
Brushed and satin metals behave differently from mirror finishes. Their surface texture spreads reflections into broad, soft streaks aligned with the brushing direction, so they respond well to large sources and show smooth gradients, but the direction of the light relative to the brush marks changes how they look. Rotate the product or the light to find the most attractive sheen.
Glass: bright-field and dark-field lighting
Clear glass is mostly transparent, so it has little appearance of its own. What makes glass visible in a photograph is its edges, where light is refracted and reflected, and its surface reflections. Two classic techniques control those edges.
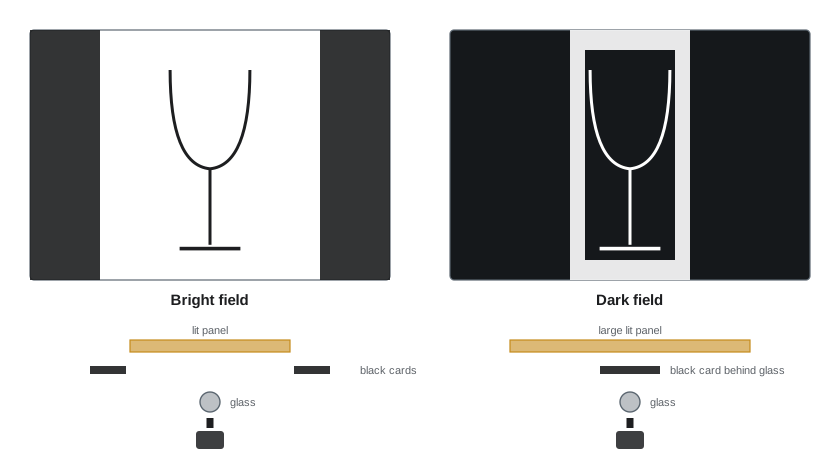
Bright-field lighting places the glass in front of a bright background, such as a white sweep or an evenly lit diffusion panel. The glass edges appear as dark lines against the bright background, because light passing through the thick edges of the glass is refracted away from the lens, and those edges show darker reflections of the surroundings. Bright-field is the standard approach for e-commerce glassware and gives a clean, graphic look. To strengthen the dark edges, place black cards at the sides of the background, just outside the frame, so that the edges refract the black into the lens. The narrower the bright area behind the glass, the more black the edges reflect and the bolder the outlines become.
Dark-field lighting places the glass in front of a black background, with light coming from behind and around it but not directly behind the glass. The glass edges then appear as bright lines against black, because they refract and reflect light from the sources at the sides into the lens. A common setup places the glass in front of a black card or flag that is slightly larger than the glass, with a large, evenly lit white background behind it. From the camera position, the glass is seen against black, but its edges pick up light from the white areas around the black card. Dark-field creates an elegant, luxurious look often used for spirits, perfume and crystal.
Why do glass edges behave this way? Light entering glass bends because of refraction. At steep angles inside the glass, light that tries to leave can be totally reflected instead, a phenomenon called total internal reflection. For glass with a refractive index around 1.5, the critical angle is:
Near the edges of a glass, where the camera looks through the material at a steep angle, light reaching the lens comes from directions well away from straight behind the glass. That is why edges show whatever is to the sides of the background, black cards in bright-field and bright panels in dark-field, rather than whatever is directly behind.
Worked problem
How wide should the black cards be?
A photographer uses bright-field lighting with a 60 cm wide lit panel 50 cm behind a 9 cm diameter glass. The edges look thin and gray. What changes should strengthen them?
Show solution
- Edges refract light from the sides; with a wide panel, they mostly see more white.
- Narrow the bright area: move black cards in from both sides until the visible bright area is just wider than the glass in the frame, perhaps 15 to 20 cm.
- Alternatively move the panel further back so that the black cards, at the same width, occupy more of the angles the edges see.
- Check at full magnification on the tethered screen and adjust until the edges are crisp and even on both sides.
Answer: Bring black cards in to narrow the lit area behind the glass, or increase the distance between glass and panel. The edges then refract black and appear as bold, even dark lines.
Glass also shows surface reflections. Large, smooth reflections of strip boxes or scrims along the sides of a bottle emphasize its shape; reflections of studio clutter look messy. Clean the glass meticulously, handle it with gloves, and use compressed air for dust. Labels on bottles often need a separate light or a separate exposure, since the lighting that suits the glass usually leaves a paper label dark or glare-ridden. Commercial bottle photography is commonly done as several captures with identical camera position, glass lit for edges in one frame, label lit in another, liquid backlit in a third, then combined in post-production.
Liquids
Liquids in clear containers look best when light passes through them. Liquid photographed with front light alone often looks dark and muddy, because the camera sees light reflected from the far side of the bottle through dense colored liquid. Backlighting makes liquids glow.
- Cut-out cards: place a white or silver card behind the bottle, cut to the shape of the liquid area and hidden from the camera by the bottle itself. Light directed onto this card from the front or side bounces back through the liquid, making it glow evenly.
- Backlit diffusion: light a diffusion panel directly behind the bottle, perhaps with a gradient that is brighter at the center.
- Diluting dark liquids: dark spirits, colas and coffee can look almost black. Stylists sometimes dilute the liquid or substitute a lighter colored liquid for clarity, but this must not mislead consumers about the product's actual color. Lesson 10 discusses the legal limits.
- Condensation: a mist of glycerin and water on cold drink containers simulates condensation that lasts much longer than real condensation under hot lights. Spray bottles, artificial ice cubes made from acrylic and gel droplets are standard beverage styling tools.
Bubbles and splashes add energy to beverage images. Bubbles in carbonated drinks can be enhanced by gently adding salt or a few grains of sugar, or created with a syringe. Splashes and pours require short flash durations and careful timing, covered in lesson 6.
Black products
Black products, such as electronics, black cookware, cameras and black leather goods, absorb most of the light that falls on them. Their detail and shape come almost entirely from reflections and from the edges catching light. Black products on black backgrounds are a classic test of a product photographer's skill.
Techniques for black products include:
- Light the reflections, not the surface: use large sources placed within the family of angles of the important surfaces, so that the glossy parts show bright reflections that reveal their shape.
- Edge or rim light: place strip boxes behind and to the sides so that the product's edges catch thin highlights that separate it from the background.
- Separation from a black background: keep the background darker than the product by distance and flagging, or use a background very slightly lighter than the product, such as dark gray, with a gradient behind the product.
- Expose for texture: give black matte surfaces enough exposure to show texture without turning them gray. A histogram check of the product area is useful; aim to keep the darkest important details clear of pure black.
- Separate exposures: as with glass, combine frames lit for different parts of the product.
Worked problem
Separating black on black
A matte black speaker reflects about 4 percent of the light falling on it. It sits on a black velvet sweep that reflects about 1 percent. If both receive the same light, how many stops brighter is the speaker? How could the photographer increase separation?
Show solution
- Ratio: 4 / 1 = 4, which is 2 stops.
- Two stops is visible but may compress to very little in print or on low-contrast screens.
- Increase separation by moving the speaker forward so the background receives less light (inverse square), flagging light off the background, or adding rim lights to the speaker edges.
- Moving the background from 1 m to 2 m from a front light adds about 2 more stops of difference.
Answer: About two stops; increasing the distance to the background and adding rim lights can create four or more stops of separation while keeping the background visually black.
White products
White products on white backgrounds face the opposite problem: the product may blend into the background, losing its edges and shape. White products also show color casts easily; any colored reflection in the room will tint them.
- Keep the background a little brighter than the product, or slightly darker, but not identical. E-commerce white backgrounds are usually exposed to pure white, about a stop or more above the product, so that the background clips cleanly while the product retains detail.
- Define edges with black cards or subtle gradients along the sides, so that the white product has visible contours.
- Use a soft but directional key so that white surfaces show subtle shading and form.
- Check for flare: an overexposed white background can spill light back toward the lens and reduce contrast on the product edges. Flag the background light from the lens and avoid overexposing the background by more than necessary.
The challenge with white-on-white is to keep the product's whites just below clipping, with gentle shading, while the background clips to pure white. Exposure is critical; tethered capture with highlight warnings and RGB readouts makes it manageable.
| Product | Main problem | Key technique |
|---|---|---|
| Chrome and polished metal | Reflects the whole studio | Design the environment: scrims, gradients, black cards, tenting |
| Brushed metal | Directional sheen | Large sources aligned with brush marks |
| Clear glass | Nearly invisible | Bright-field or dark-field edge control |
| Liquids in bottles | Dark and muddy | Backlight with cut-out cards or diffusion |
| Black products | Absorb light, lose detail | Light reflections, rim light, background separation |
| White products | Blend into white backgrounds | Edge definition, controlled exposure, flare control |
Common mistakes
MistakeLighting chrome with direct lights and wondering why it looks harsh and messy.
InsteadLight large scrims and cards that the chrome reflects.
MistakePhotographing liquids with front light only.
InsteadBacklight the liquid with cut-out cards or diffusion.
MistakeUsing one exposure for glass, label and liquid.
InsteadShoot separate frames for each part and combine them.
MistakeExpecting a polarizer to remove reflections from bare metal.
InsteadUse polarizers for glass, paint and plastic; control metal reflections with the environment.
MistakeExposing the white background just to white with no margin.
InsteadOverexpose the background slightly to clip cleanly while controlling flare.
Summary and key terms
- A reflective surface looks as bright as what it reflects, so the photographer designs the environment.
- Metal is shaped with scrims, gradients, black cards and tenting, with the camera hidden.
- Bright-field lighting gives dark glass edges on white; dark-field gives bright edges on black.
- Glass edges show what lies to the sides because of refraction and total internal reflection.
- Liquids glow when backlit with cut-out cards or diffusion.
- Black products need lit reflections, rim light and background separation.
- White products need edge definition and careful exposure relative to the background.
- Bright-field
- Glass lit against a bright background, giving dark edges.
- Dark-field
- Glass lit against black with light around it, giving bright edges.
- Tenting
- Surrounding a product with diffusion so it reflects even white.
- Refraction
- Bending of light as it passes between materials.
- Total internal reflection
- Complete reflection inside a material beyond the critical angle.
- Critical angle
- Angle beyond which total internal reflection occurs.
- Cut-out card
- A reflector shaped and hidden behind a liquid to make it glow.
- Cross-polarization
- Polarized lights and lens filter to remove specular reflections.
- Rim light
- A light from behind that outlines edges.
- Flare
- Stray light reducing contrast in the image.
Practice problems
Work each problem on paper first, then reveal the answer to check.
Why does a curved chrome object reflect so much?
Show answer
Its curvature reflects a very wide field of view.
What does tenting do?
Show answer
Surrounds a product with even white for reflection.
Bright-field glass edges appear:
Show answer
Dark against a bright background.
Dark-field glass edges appear:
Show answer
Bright against black.
Critical angle for n = 1.5?
Show answer
About 41.8°.
How do you make a liquid glow?
Show answer
Backlight it, often with a hidden cut-out card.
What simulates lasting condensation?
Show answer
A glycerin and water mist.
4% versus 1% reflectance in stops?
Show answer
Two stops.
Do polarizers remove reflections from bare metal?
Show answer
Very little.
Why expose a white background above the product?
Show answer
To clip cleanly to white while keeping product detail.
Lesson quiz · 5 questions
Score 60% or more to complete this lesson.
Create a free account to save your progress, take quizzes and earn a certificate.