
CINE-221 · Lesson 2 of 12 · 25 min
Studying real light and building references
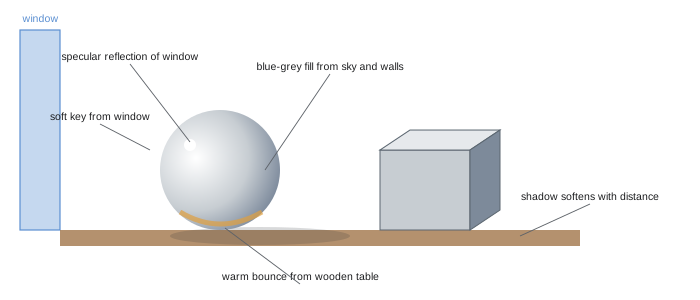
Naturalistic lighting depends on knowing how real light behaves, and the best way to learn is to look. Cinematographers train themselves to notice the direction of shadows on a street, the colour of light in a kitchen at dusk, the way a face looks beside a window on an overcast day, and the subtle glow that a white tablecloth throws onto a diner's chin. They also study painting, photography and other films, collecting references that help them describe and achieve a look. This lesson covers observing light in everyday life, the language for describing it, measuring real scenes, painters and photographers as teachers, analysing films, building reference collections and look books, and using references in prep without copying.
Learning to see
Most people see objects, not light. Learning to see light means paying attention to qualities usually filtered out: which side of a face is brighter and why; whether shadow edges are crisp or soft; where reflections and highlights fall; what colour the shadows are; how quickly light falls off across a room. Useful exercises include sitting in the same room at different times of day and noting how the light changes; photographing a person by a window in different weather; watching how streetlights, shop windows and car headlights light passers-by at night; and looking at the shadow side of objects to see the colour of bounced light. Many cinematographers keep a light diary, a notebook or phone album of interesting light they encounter, with notes on time, place and why it caught their attention.
A vocabulary for light
Describing light precisely helps cinematographers communicate with directors, gaffers and colourists. Useful terms include:
- Key side and shadow side: the lit and unlit sides of a subject.
- Hard and soft, with intermediate qualities such as "soft but directional" for a window without curtains on an overcast day.
- Wrap: how far light reaches around a rounded subject toward the shadow side; large, close sources wrap more.
- Fall-off: how quickly light diminishes across a subject or space.
- Contrast ratio: the difference in stops between the key and shadow sides (CINE-220).
- Ambience or base: the general level of light in a space.
- Kick, rim and edge: bright highlights on the edge of a subject from behind.
- Spill and bleed: light that falls beyond its intended area.
- Pools and patches: discrete areas of light, such as under streetlights or through blinds.
- Colour contrast: differences in colour between sources, such as warm interior light against cool exterior light.
Shared vocabulary allows a director to say "I want this to feel like the end of a long afternoon" and a cinematographer to translate it into "low, warm, hard sun through the windows, raking across the floor, with cool, soft ambience in the shadows".
Measuring real light
Measuring real scenes builds an intuitive sense of light levels and ratios. With an incident meter and a spot meter, or with a camera and false colour, measure the light in familiar places: the key-to-fill ratio on a face by a window, the difference between a sunlit street and the shade, the brightness of a desk lamp shade compared with the face it lights, the exposure for a street at night. Recording these measurements, in stops and colour temperatures, shows that real scenes often have very high contrast, much higher than the camera can hold, and that our eyes compress this range constantly. It also shows which ratios feel natural: for example, an interior lit by a window on a sunny day may have the window several stops brighter than the faces, and the far corners of the room several stops darker.
| Real scene | Typical measurement | Notes |
|---|---|---|
| Face by north window, overcast | Key-to-shadow 2–3 stops | Soft, wrapping, cool |
| Face in direct sun | Key-to-shadow 4–6 stops | Hard, needs fill or backlight |
| Window vs interior faces, sunny day | Window 3–6 stops brighter | Often needs ND gel |
| Desk lamp shade vs face | Shade 2–4 stops brighter | Dim practical or add soft fill |
| Streetlight pool vs dark street | Pool 4–6 stops brighter | Deep contrast at night |
Worked problem
Measuring a kitchen at dusk
A cinematographer scouts a kitchen at dusk for a scene. With a meter at EI 800, 24 fps, 180°, the face by the window reads T2, the window reads T5.6, the shadow side of the face reads T1, and a pendant lamp over the table reads T11 on its glass. What does this tell them about lighting the scene?
Show solution
- Key side to shadow side: T2 to T1 is 2 stops, a natural, gentle ratio.
- Window to face: T2 to T5.6 is 3 stops, so the window will be bright but probably within range.
- Pendant glass to face: T2 to T11 is 5 stops, likely to clip; it should be dimmed or fitted with a lower-wattage bulb.
- The face at T2 is quite dark for EI 800; adding a soft source motivated by the window may lift it to about T2.8 while keeping the 2-stop ratio.
Answer: The natural ratios are pleasing, but the pendant needs dimming and the face could be lifted about a stop with a window-motivated soft source.
Painters as teachers
Painters solved the problems of representing light centuries before cinema, and many cinematographers study them closely. Johannes Vermeer painted soft, directional window light falling across interiors, with luminous shadows and subtle bounce, a model for daylight interiors. Caravaggio and Georges de La Tour used dramatic, hard light against deep darkness (chiaroscuro and tenebrism), with candlelight and single sources. Rembrandt's portraits gave their name to a lighting pattern and showed how a single source can model a face. Edward Hopper painted the isolation of modern spaces: hard sun through windows, diners at night, cool streetlights and warm interiors, an influence on countless films. Impressionists such as Claude Monet studied how colour changes with time of day and weather. Looking at paintings, ask the same questions as on set: where is the source, how big is it, what colour are the shadows, where does the eye go first?
Photographers and films as references
Photographers offer references closer to the camera's way of seeing. Documentary and street photographers such as Saul Leiter, William Eggleston, Fan Ho and Gregory Crewdson (whose staged images use cinematic lighting crews) show real or constructed light in everyday places. Fashion and portrait photographers show how to sculpt faces. Studying films is equally important: watching scenes with the sound off, pausing on frames, and diagramming where each source must be, how faces are lit, and how light changes from shot to shot. Many cinematographers draw floor plans of admired scenes, inferring fixture positions from shadows and catchlights, then test their deductions on small setups.
Building reference collections
Over time, cinematographers build personal libraries of references: screenshots from films, photographs, paintings, their own light diary images, and tests. Organizing them by situation, such as day interior, night exterior, car at night, fire, rain or hospital, or by mood, such as warm nostalgia, cold isolation or menace, makes them useful when prepping a project. Digital tools such as image boards, shared folders and dedicated reference platforms make it easy to collect and share references. Always note the source of each reference: who shot it, what film or artist, so that it can be discussed accurately and credited.
Look books and lighting references in prep
In pre-production, cinematographers often prepare a look book: a document of images and text describing the intended visual style of a project, including lighting, colour, framing, camera movement and texture. The lighting section may include references for each major location and time of day, with notes on the sources and mood. Look books help directors, producers, production designers, costume designers and gaffers share a vision. They are also persuasive tools when cinematographers interview for jobs. A good look book shows a coherent idea rather than a collection of beautiful but unrelated images. Lesson 12 discusses look books and lighting style in more detail.
Using references without copying
References are a means of communication, not templates. Lighting a scene to copy a famous frame exactly rarely serves the new story, the actors, the location or the budget. Instead, identify what makes a reference work: perhaps the low, warm sun raking across a floor, or the single soft source with deep shadow behind. Then apply that principle to the new scene. Combining elements from several references, such as the colour of one with the contrast of another, often produces something original. Being honest about influences, while making them your own, is part of the craft.
Tests and experiments
Theory and references become skill through practice. Small lighting tests, done with a stand-in, a camera and a few lights, let cinematographers try ideas before the shoot: how large a source needs to be to feel like a window, how much warmth makes a lamp feel cosy rather than orange, how dark a night scene can be before faces lose detail. Many cinematographers set up a simple test space at home or in a studio to practise lighting a face as if by a window, a lamp, a television or a streetlight, photographing the results and comparing them with references. These experiments are among the most valuable investments in developing a naturalistic eye.
Observing faces in real light
Faces deserve special study, because they are where audiences look most. Notice how a face changes as a person turns from a window: the catchlights in the eyes move and shrink, the shadow side deepens, and the colour of the skin shifts with the colour of the light. Notice how overhead office lighting creates shadows under the brows and chin, and how a white table or a sheet of paper fills them. Notice the warm glow under a chin from a candle or a phone screen, and the cool rim on a cheek from a window behind. Notice how different skin tones respond: darker skin reflects more specular highlight relative to its diffuse tone and benefits from larger, softer sources that create pleasing sheen, while lighter skin shows shadows and colour casts more readily. Photographing friends in everyday light, with a phone or camera, and comparing the images with what you saw, builds a library of real faces in real light.
Analysing a scene step by step
A structured approach helps when analysing reference scenes. First, identify the key on each face: its direction from the catchlights and shadow positions, and its quality from the softness of shadow edges. Second, identify fill: how dark the shadow side is, and whether the fill is coloured. Third, identify backlight and edge light. Fourth, look at the background: how bright it is relative to faces, what sources are visible, and how light falls off. Fifth, note colour: the white balance, the colours of each source and the overall palette. Finally, consider how the light serves the story: why might the cinematographer have chosen this? Writing short notes in this order for each reference makes them easier to compare and discuss.
Light and memory
Directors often describe the light they want through memories: the kitchen of a grandparent's house, the school corridor on a winter afternoon, the light in a hospital waiting room. Asking about such memories, and the details people remember, helps cinematographers translate emotional descriptions into practical choices. Memory light is often softer, warmer and more selective than real light; recreating it may involve slightly heightened naturalism.
Sharing references with the crew
References become most useful when the whole team sees them. Sharing a curated selection with the gaffer, key grip, production designer and costume designer before the tech scout lets everyone arrive with ideas about how to achieve the look. Annotating references with short notes, such as "soft key from window, no fill, warm practical in background", turns them into practical instructions. Printing a few key frames for the set, or keeping them on a tablet at the monitor, helps keep the style consistent during long shooting days, when fatigue makes it easy to drift from the plan.
Common mistakes
MistakeSeeing objects rather than light.
InsteadTrain attention on direction, quality, colour and fall-off.
MistakeVague descriptions such as "make it moody".
InsteadDescribe sources, quality, contrast and colour precisely.
MistakeCopying a reference frame exactly.
InsteadExtract its principles and adapt them.
MistakeLook books full of unrelated images.
InsteadShow a coherent visual idea.
MistakeSkipping tests.
InsteadTest lighting ideas before the shoot.
Summary and key terms
- Learning to see means noticing direction, quality, colour and fall-off.
- A precise vocabulary helps communicate lighting ideas.
- Measuring real scenes builds intuition about natural ratios.
- Painters such as Vermeer, Caravaggio, Rembrandt and Hopper teach light.
- Photographs and films provide camera-based references.
- Organized reference collections and look books support prep.
- Use references for principles, not copies, and test ideas.
- Light diary
- Record of observed light for study.
- Key side
- The lit side of a subject.
- Shadow side
- The unlit side of a subject.
- Wrap
- How far light reaches around a subject.
- Base light
- General ambient level in a space.
- Spill
- Light falling outside its intended area.
- Chiaroscuro
- Strong contrast between light and dark.
- Tenebrism
- Dramatic chiaroscuro with dominant darkness.
- Look book
- Document describing a project's visual style.
- Lighting test
- Trial setup to try lighting ideas.
Practice problems
Work each problem on paper first, then reveal the answer to check.
What is a light diary?
Show answer
A record of interesting light with notes.
What does wrap describe?
Show answer
How far light reaches around a subject.
Typical key-to-shadow ratio in direct sun?
Show answer
About 4–6 stops.
A face at T2 and a window at T5.6 differ by?
Show answer
3 stops.
What did Vermeer paint well?
Show answer
Soft window light in interiors.
Which painter is linked with tenebrism?
Show answer
Caravaggio.
What did Hopper depict?
Show answer
Isolation in modern spaces, hard sun, night diners.
How can you learn from films?
Show answer
Pause frames and diagram the sources.
What should a look book show?
Show answer
A coherent visual idea.
Why use references for principles?
Show answer
Copying rarely suits the new story and location.
Lesson quiz · 5 questions
Score 60% or more to complete this lesson.
Create a free account to save your progress, take quizzes and earn a certificate.