
CINE-221 · Lesson 6 of 12 · 25 min
Practicals and practical integration
Practicals are light sources that appear in the frame: table lamps, ceiling fixtures, candles, neon signs, screens, streetlights, car headlights. They tell the audience where light comes from, establish time, place and mood, add depth and points of interest to compositions, and motivate the light on actors. Modern cinematography relies on practicals more than ever, because fast sensors can record scenes lit largely by them. But practicals rarely work straight out of the box: bulbs are too bright or too dim, colours are wrong, shades glow unevenly, and their light on faces is seldom flattering. This lesson covers the roles of practicals, choosing bulbs and fixtures, controlling brightness, colour and dimming, shades and exposure, supplementing practicals, hiding lights in and near practicals, designing practicals with production design, and screens and LED practicals.
The roles of practicals
Practicals serve several purposes at once. As visible sources, they motivate the light on actors and in the room: an audience seeing a lamp accepts warm light from that direction. As compositional elements, they create highlights and depth in the frame, drawing the eye and separating planes; a practical in the background of a dark shot adds a point of interest and indicates the space beyond. As storytelling devices, they establish period, place and character: a flickering fluorescent tube, a green banker's lamp, a bare bulb, a string of fairy lights. And as actual light sources, they contribute to exposure, especially at night, when a well-placed practical may light much of a scene. Planning practicals with the production designer is one of the cinematographer's most important prep tasks.
Choosing bulbs and fixtures
The bulb inside a practical determines its brightness, colour and how it dims. Traditional incandescent bulbs dim smoothly and warm as they dim, a pleasing, natural effect, but are increasingly hard to buy and inefficient. Household LED bulbs come in many colour temperatures and outputs but vary in colour quality, may flicker on camera or with dimmers, and may not dim smoothly. Professional film practical bulbs, LED bulbs designed for cinema with high colour rendering, flicker-free drivers and wireless control of brightness and colour, are now common and allow practicals to be adjusted from a tablet without touching the lamp. For hidden sources inside or near practicals, small LED panels, ribbons and bulbs designed for film are used. Choose bulbs whose colour and output suit the shot, test them on camera for flicker and colour, and keep spares.
| Practical bulb type | Advantages | Drawbacks |
|---|---|---|
| Incandescent | Smooth dimming, warm shift, full spectrum | Hot, inefficient, harder to obtain |
| Household LED | Cheap, cool running, many options | Variable colour quality, possible flicker, uneven dimming |
| Film LED practical bulbs | High CRI, flicker-free, wireless control | Cost, need setup |
| Fluorescent tubes | Period and institutional look | Green spike, flicker risk, hard to dim |
| LED tubes (film) | Controllable colour, effects, battery options | Cost, different look from real tubes |
Controlling brightness
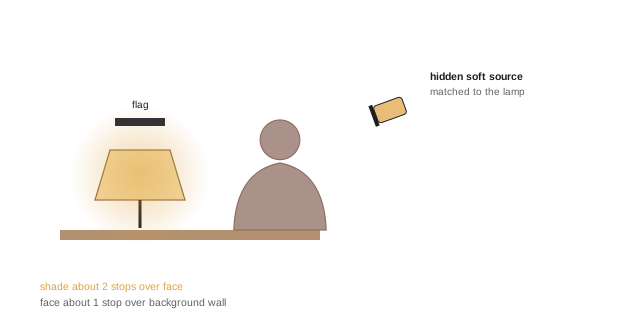
Practicals often clip, because the bulb or shade is far brighter than the faces they are meant to light. Typical targets put a lampshade 1 to 3 stops above the face it motivates, so that it glows but retains some texture and colour; a bare bulb is usually allowed to clip, but its size and bloom should be controlled. Brightness can be reduced by dimming the bulb with a dimmer or wireless control, using a lower-output bulb, adding neutral density material or diffusion inside the shade, or wrapping part of the bulb. Brightness can be increased by using a stronger bulb or placing a small source inside. Dimming incandescent bulbs warms them significantly; dimming LEDs may not, depending on the bulb. Each practical should be measured with a spot meter or false colour and adjusted individually.
Worked problem
Balancing a lampshade and face
At T2, a table lamp's shade reads T8 on a spot meter and the actor's face, lit partly by the lamp, reads T2. The cinematographer wants the shade 2 stops over the face. What adjustment is needed?
Show solution
- Shade to face: T2 to T8 is 4 stops.
- Desired: 2 stops, so the shade must be reduced by 2 stops.
- Dim the bulb by 2 stops (a quarter of its light), or line the inside of the shade with ND 0.6 material.
- If dimming reduces the face light too much, add a small soft source on the same side to restore the face to T2.
Answer: Reduce the shade by 2 stops with dimming or ND inside the shade, and supplement the face if needed.
Colour and dimming
Practical colour should be a deliberate choice. Warm practicals around 2,200 to 3,000 K read as homely and evening-like against a camera balanced near 3,200 to 4,300 K; matched practicals, at the same colour as the key, look neutral; cool or coloured practicals, such as a blue television, green fluorescent or red neon, set mood and place. When several practicals share a room, consistent colours feel natural unless variety is motivated. Practicals on dimmers or wireless control can be adjusted shot by shot and even during takes, for example to create a lamp being switched on. The warm shift of dimmed incandescent bulbs, about 100 K per 10 % of voltage near full power and more at low levels, is part of their character; LED film bulbs can emulate it or keep colour constant.
Shades and exposure
The shade determines how a practical looks and how it throws light. Translucent shades glow and spread soft light into the room; opaque shades direct light down and up in pools; coloured shades tint light. White shades on white walls produce bright hot spots on the wall above and below, which can draw attention; small flags or black wrap on the inside of the shade reduce them. Lining part of a shade with black wrap or diffusion controls where the light goes. Set decorators often keep several shade options so that the cinematographer can choose. On wide shots, practicals with very bright, clipped shades look harsh; even shading with slight texture looks more natural.
Supplementing practicals
Practicals rarely light faces well by themselves: they are often too low, too far, too hard or uneven. The standard approach is to keep the practical as the visible motivation and add a hidden source that reproduces its light more flatteringly: a small soft source just out of frame on the same side and height, matched in colour, or a bounce from a white surface near the lamp. For overhead practicals such as pendants or ceiling fixtures, a soft source above the frame line, in the same position, extends their light. The supplementary light should create shadows and highlights consistent with the practical, so that the audience reads it as the lamp's light. When an actor moves away from or toward a practical, the supplementary light must follow the logic, brightening as they approach and dimming as they move away, which may require cues on a dimmer.
Hiding lights in and near practicals
Lighting crews hide small sources inside and around practicals: an LED bulb inside a lamp with a hidden panel aimed at the actor; a strip of LED tape hidden behind a counter to light the faces of people sitting at it; small lights in bookshelves, behind doors, inside cars and in ceiling fixtures. Hidden sources let practicals light more of a scene while keeping the frame clean. They must be concealed from all camera angles, safe from heat and electrical hazards, and powered discreetly with hidden cables or batteries. Because they are close to the action, small, low-heat LED sources are the norm.
Designing practicals with production design
The most effective practicals are planned in pre-production. The cinematographer and production designer decide what practicals each set needs, where they will be placed, what bulbs and shades they will use, and whether they can be fitted with film bulbs, dimmers or wireless control. Ceiling fixtures may be designed to accept powerful LED sources and to be rigged from above. Practicals can be added to locations, such as lamps on sideboards or strings of lights in a garden, to motivate lighting where none existed. Period films require practicals appropriate to their era, from gas lamps and candles to early fluorescent fixtures, which often must be fitted with modern sources that imitate period light. A practicals list, describing each fixture, bulb and control, is often part of the lighting plan.
Screens and LED practicals
Television screens, computer monitors, phones and digital signs are practicals that can be difficult on camera. Their brightness, colour and refresh rate may cause clipping, colour casts, flicker or scan lines. Common solutions include replacing screen content with graphics designed for camera brightness and colour; adjusting screen brightness and white point; using screens with high refresh rates or matching the camera shutter to avoid flicker; and adding screen glow on faces with a small soft LED programmed with screen-like flicker or colour changes (Lesson 11). Phone screens often appear too dim or too blue; a small handheld LED or a light hidden near the phone can lift the face. LED signage and neon can be tested for colour and flicker and dimmed as needed.
Practicals in period settings
Period films demand practicals appropriate to their era. Before electric light, interiors were lit by candles, oil lamps and gas lamps, each with distinctive colour, brightness and flicker: candles and oil lamps around 1,800 to 2,000 K with flicker, gas mantles somewhat whiter and steadier. Early electric bulbs were dim and warm, with visible filaments. Mid-century homes used incandescent table lamps and ceiling fixtures; offices and institutions used fluorescent tubes with a greenish cast. Late twentieth-century interiors added halogen lamps and the cool glow of cathode-ray televisions. Contemporary interiors mix LED fixtures of various colours with screens. Replicating these sources requires research into period fixtures and the use of modern film bulbs that imitate their colour and behaviour, often with flicker or warm dimming programmed in.
Practicals and exposure in wide shots
In wide shots, many practicals may be visible at once, and their relative brightness shapes the composition. Practicals far from the camera appear smaller and contribute highlights; those close to the lens can flare or dominate the frame. Balancing several practicals involves measuring each, adjusting them so that the eye moves through the frame as intended, and making sure that the brightest practical is not stealing attention from the actors. Practicals in the background are often set a little brighter than those in the foreground to draw the eye into depth.
Neon and signage
Neon signs, LED signs and illuminated displays are powerful practicals in urban and commercial settings. Their saturated colours can clip single channels and produce colour casts on nearby faces, which may be desirable for mood or may need control. Real neon tubes are often dimmable only with special transformers; LED neon substitutes are easier to control. Testing signs on camera for brightness, flicker and colour, and adjusting with dimmers, ND or diffusion, ensures that they glow attractively without overwhelming the image. Coloured light from signs falling on actors can be enhanced with matching hidden sources.
Practicals and the camera's point of view
Practicals often look different from the camera position than from the set. A lamp that seems pleasantly bright in the room may clip on camera, while one that seems dim may barely register. Shades viewed from below show the bare bulb; viewed from above, they may show the inside of the shade glowing. Always judge practicals on the camera monitor with the production's LUT, and adjust shade angle, bulb position and height for the camera's view. Small changes, such as tilting a shade or rotating a bulb, can make a large difference.
Common mistakes
MistakeLetting lampshades clip to pure white.
InsteadDim or line shades so they glow with texture.
MistakeRelying on practicals to light faces alone.
InsteadSupplement with matching hidden sources.
MistakeUsing untested household LED bulbs.
InsteadTest for flicker and colour, or use film bulbs.
MistakeIgnoring hot spots on walls around shades.
InsteadFlag or black-wrap shades to control spill.
MistakePlanning practicals only on the shoot day.
InsteadDesign them with the production designer in prep.
Summary and key terms
- Practicals motivate light, add depth and establish time, place and character.
- Choose bulbs for colour, output, dimming and flicker behaviour.
- Lampshades typically sit 1–3 stops above the faces they motivate.
- Colour and dimming of practicals are deliberate choices.
- Shades control glow, pools and hot spots.
- Hidden supplementary sources extend practical light to faces.
- Plan practicals and screens with production design and test them.
- Practical
- Light source visible in frame.
- Film practical bulb
- High-CRI, flicker-free controllable LED bulb for cinema.
- Dimmer
- Device that reduces a light's output.
- Warm shift
- Colour warming of incandescent bulbs as they dim.
- Black wrap
- Heat-resistant black foil for controlling spill.
- Hot spot
- Bright patch of light on a surface near a source.
- Supplementary source
- Hidden light that extends a practical's effect.
- LED tape
- Flexible strip of LEDs for hiding in sets.
- Practicals list
- Plan of each practical fixture, bulb and control.
- Scan lines
- Bands caused by screen refresh on camera.
Practice problems
Work each problem on paper first, then reveal the answer to check.
Name three roles of practicals.
Show answer
Motivation, composition, storytelling, actual light.
Why are film LED practical bulbs useful?
Show answer
High CRI, flicker-free, wireless control.
Typical shade level relative to face?
Show answer
1–3 stops above.
Shade at T11, face at T2.8; how many stops difference?
Show answer
4 stops.
What happens to incandescent colour when dimmed?
Show answer
It warms.
How do you reduce wall hot spots from shades?
Show answer
Flags or black wrap inside the shade.
How should a supplementary source be placed?
Show answer
Same side and height as the practical, hidden, matched colour.
Why use small LEDs for hidden sources?
Show answer
Low heat and easy to conceal.
What is a practicals list?
Show answer
Plan of each practical fixture, bulb and control.
How do you handle a dim, blue phone screen?
Show answer
Adjust content and add a small hidden LED to the face.
Lesson quiz · 5 questions
Score 60% or more to complete this lesson.
Create a free account to save your progress, take quizzes and earn a certificate.