
VIS-101 · Lesson 8 of 12 · 27 min
Light and shadow as composition
A camera records light, not objects. The same face, street or landscape can look flat or sculpted, cheerful or menacing, cluttered or simple, depending entirely on where the light comes from, how hard or soft it is, and where the shadows fall. Painters such as Caravaggio and Rembrandt built their compositions from pools of light in darkness; film noir cinematographers composed with hard shadows and silhouettes; landscape photographers wait hours for light that reveals the shape of the land. VIS-110 explains the physics of light, exposure and colour temperature. This lesson treats light and shadow as compositional elements: how direction and quality of light shape form, how tonal key sets mood, how shadows become shapes and lines in their own right, how light guides the eye, and how to work with natural and artificial light to compose.
Direction of light
The direction of the main light relative to the camera determines which surfaces are lit, where shadows fall, and therefore how much form and texture the image shows.
| Direction | Effect on the subject | Compositional character |
|---|---|---|
| Front (from the camera) | few visible shadows; flat, minimal texture and form | clean, even, revealing colour; can look flat |
| 45° side (three-quarter) | shadows model the face and form; a triangle of light on the far cheek (Rembrandt lighting) | classic portrait light; natural and sculptural |
| 90° side | one half lit, one half dark (split lighting) | dramatic, mysterious, divided character |
| Back (toward the camera) | rim of light around edges; front in shadow | separation from background, glow, silhouette |
| Top | shadows under brows, nose and chin | harsh at midday; can look tired or ominous |
| Under (from below) | shadows cast upward | unnatural and eerie, the "campfire story" look |
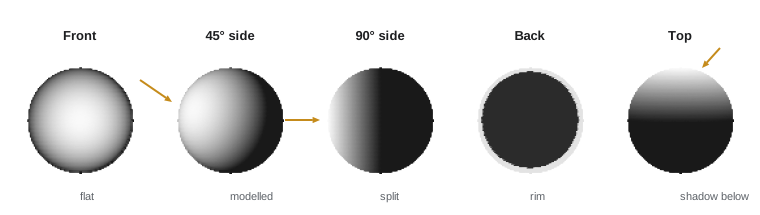
Because side light reveals both form and texture (Lesson 2), it is the most commonly chosen direction when the goal is depth and modelling. Back light is especially valuable compositionally: the bright rim it creates around hair, shoulders or leaves separates the subject from a darker background, adding depth even when the subject and background have similar values. Shooting into the light also creates glow, lens flare and atmospheric haze, which many photographers use deliberately.
Quality of light: hard and soft
Light quality describes how abruptly light changes to shadow. Hard light comes from a source small relative to its distance from the subject, such as direct sun or a bare bulb, and produces crisp, dark shadows with sharp edges. Soft light comes from a large source, such as an overcast sky, a window with diffuse light, or a softbox, and wraps around the subject with gentle, graduated shadows. The key factor is the apparent size of the source as seen from the subject: moving a softbox closer makes the light softer; the sun, enormous but very far away, is a small and therefore hard source.
Hard light is graphic: it creates strong shapes, deep blacks, texture and drama, but also harsh shadows under eyes and noses and high contrast that can exceed the camera's range. Soft light is forgiving and flattering, smooths skin and shows detail in shadows, but can look flat if it is also frontal. Choosing light quality is a compositional choice: a fashion photographer might use hard light for a bold, graphic look, while a portrait of an elderly person might use soft window light for gentleness, or hard side light to celebrate the texture of a lifetime.
Contrast and lighting ratio
The difference in brightness between the lit and shadow sides of a subject is the lighting ratio. With a key light and a fill light, the ratio is often expressed as the ratio of illumination on the lit side (key plus fill) to that on the shadow side (fill only). Each doubling is one stop (VIS-110):
A 2:1 ratio (one stop) gives gentle modelling suitable for corporate portraits and beauty work; 4:1 (two stops) gives noticeable drama; 8:1 (three stops) and above approaches the strong chiaroscuro of film noir and Renaissance painting. The ratio is controlled by moving or dimming the fill light, or by using a reflector to bounce some key light back into the shadows.
Worked problem
Setting a lighting ratio
A key light gives 800 lux on a subject's face; a fill light from the camera position gives 200 lux on both sides. What is the lighting ratio and difference in stops? How would you achieve a 2:1 ratio?
Show solution
- Lit side: \(800 + 200 = 1{,}000\) lux; shadow side: 200 lux.
- Ratio \(= 1{,}000/200 = 5:1\); stops \(= \log_2 5 = 2.3\).
- For 2:1, the fill must equal the key: \((800 + F)/F = 2\) gives \(F = 800\) lux. Raise the fill to 800 lux, or reduce the key to 200 lux with the fill unchanged.
Answer: The setup gives about 5:1, a little over two stops, a fairly dramatic look. Matching the fill to the key gives 2:1, the gentle modelling typical of interviews. By the inverse square law, moving a light to half its distance quadruples its illumination, so small moves change the ratio quickly.
Tonal key: high key and low key
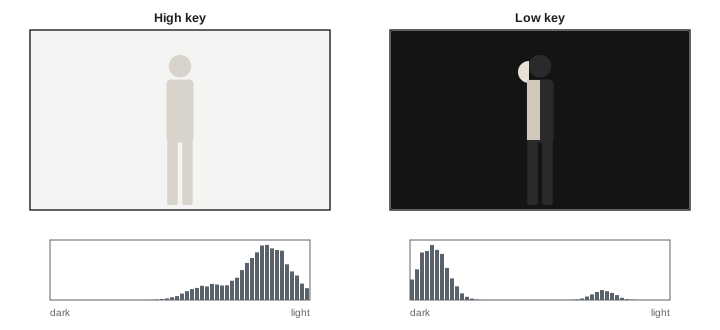
The overall distribution of tones in an image is its key. A high-key image is dominated by light tones, with few dark areas and soft, low-contrast lighting; it feels bright, open, clean and optimistic, and is common in advertising, beauty, children's and lifestyle imagery. A low-key image is dominated by dark tones, with small areas of light, usually from hard, directional lighting; it feels dramatic, mysterious, intimate or sombre, and is common in film noir, thrillers, fine-art portraits and still life. A middle-key image uses the full range of tones.
The histogram, a graph of how many pixels have each brightness level, shows the key at a glance: a high-key image piles its pixels to the right, a low-key image to the left. Neither is "underexposed" or "overexposed" if it is deliberate; what matters is that important highlights and shadows hold the detail the image needs.
Shadows as compositional elements
Shadows are not just the absence of light; they are shapes, lines and spaces that can be composed:
- Shadows simplify. Deep shadow hides clutter, turning a busy background into clean negative space and isolating the lit subject. Photographers working in harsh midday light often expose for the highlights and let shadows go black for a graphic look.
- Shadows create lines and patterns. Long shadows of trees, railings or people at low sun angles become strong diagonal lines (Lesson 2); shadows through blinds or a lattice create pattern on a subject or wall.
- Shadows add mystery and implied presence. A shadow of a person entering a frame, or a silhouette on a wall, suggests a story without showing everything.
- Shadows reveal shape and position. A cast shadow anchors an object to the ground and shows the direction of light; floating objects without shadows look pasted in.
A silhouette is the extreme case: a subject entirely dark against a bright background, reduced to pure shape. Silhouettes work when the outline is distinctive and readable: a person in profile, a figure with arms raised, a tree with clear branches. Overlapping silhouettes merge into confusing shapes, so separate them.
Light that guides the eye
The eye goes to the brightest area of an image and to the area of greatest contrast (Lesson 9). Light can therefore be used to direct attention as precisely as lines or placement:
- Light the subject more brightly than its surroundings. Theatre and film lighting do this constantly; in photography, a subject in a patch of sunlight, or near a window in a darker room, gains instant prominence.
- Darken the edges. A vignette, natural (from the lens or the scene) or added in editing, keeps the eye from drifting out of the frame.
- Use pools of light and shafts of light to create a path through the image.
- Avoid bright distractions near the edges: a bright sky patch in a corner, a white sign or a specular reflection can pull the eye away from the subject.
Worked problem
Fixing a bright distraction
An environmental portrait of a mechanic in a dim garage has a bright open door in the top right corner. Viewers keep looking at the door instead of the mechanic. Give three ways to fix it, at the shoot and in editing.
Show solution
- At the shoot: change the camera position so the door is out of frame or hidden behind the mechanic.
- At the shoot: add light on the mechanic, with a work light or a flash bounced off a wall, so that the subject becomes the brightest area.
- In editing: darken the door area with a local adjustment and add a subtle vignette.
Answer: Remove the distraction, out-brighten it with light on the subject, or tone it down in editing. The first two are best because they solve the problem in the scene; editing a large bright area down often looks artificial.
Natural light through the day
Natural light changes in direction, height, colour and quality through the day, and choosing when to shoot is one of the most powerful compositional decisions outdoors:
- Golden hour, shortly after sunrise and before sunset: low, warm, directional light, long shadows and texture; flattering for people and dramatic for landscapes.
- Blue hour, just before sunrise and after sunset: soft, cool, even light with a deep blue sky; city lights balance with the sky.
- Midday sun: high, hard light with short shadows under features; difficult for portraits but strong for graphic shadows, architecture and high-contrast street work.
- Overcast: a giant softbox; low contrast and soft shadows, good for portraits, forests and saturated colours, but skies may be featureless and should often be excluded.
- Window light: directional and soft, the classic indoor portrait light; the closer the subject to the window, the softer and brighter the light.
In Canada, the timing and length of golden and blue hours vary greatly with latitude and season: near the summer solstice in northern locations the sun stays low for hours and twilight lasts much of the night, while in winter the sun stays low all day, giving long shadows even at noon. Apps and websites that show sun position for any place and date help plan shoots.
Artificial light: motivated and three-point lighting
When light can be controlled, a common starting point is three-point lighting: a key light provides the main illumination and shapes the subject; a fill light, on the other side, controls the lighting ratio; and a back light (or rim light) separates the subject from the background. A fourth background light can add separation or a pool of light behind the subject. Three-point lighting is a template, not a rule: many images use a single key with a reflector, or deliberately omit the fill for drama.
In film and video, lighting is usually motivated: it appears to come from a source within the scene, such as a window, a lamp or a screen, even when the actual light is a film lamp placed out of frame. Motivated lighting keeps the image believable while allowing the cinematographer to place the brightest areas exactly where the composition needs them. Practical lights, lamps visible in the frame, add depth and points of interest, and are often dimmed or fitted with low-wattage bulbs so they do not overexpose.
Common mistakes
MistakeLighting every subject from the front.
InsteadUse side or back light to reveal form, texture and separation.
MistakeShooting portraits in harsh overhead midday sun without modification.
InsteadFind open shade, use a diffuser or fill, or wait for lower light.
MistakeTreating any dark or bright histogram as a mistake.
InsteadJudge exposure by intent; high-key and low-key images are valid.
MistakeLeaving bright distractions near the frame edges.
InsteadExclude them, out-light them, or darken them.
MistakeOverlapping silhouettes into a confusing mass.
InsteadSeparate silhouettes so each outline reads clearly.
Summary and key terms
- Light direction controls form: front light flattens, side light models, back light separates.
- Hard light from small sources gives crisp shadows; soft light from large sources gives gentle gradation.
- Lighting ratio, key plus fill over fill, sets contrast; each doubling is one stop.
- High-key and low-key images set mood; histograms show the tonal distribution.
- Shadows simplify, create lines and patterns, suggest presence and anchor objects.
- The eye goes to the brightest, highest-contrast area; light can guide it to the subject.
- Natural light changes through the day; artificial lighting uses key, fill and back lights, usually motivated.
- Side light
- Light from about 45° to 90° to the camera axis, revealing form.
- Rim light
- Light from behind that outlines the subject's edges.
- Hard light
- Light from a small source, producing sharp shadows.
- Soft light
- Light from a large source, producing gradual shadows.
- Lighting ratio
- The ratio of illumination on the lit and shadow sides of a subject.
- High key
- An image dominated by light tones and low contrast.
- Low key
- An image dominated by dark tones with small bright areas.
- Chiaroscuro
- Strong contrast between light and dark used to model form.
- Three-point lighting
- Key, fill and back lights arranged around a subject.
- Motivated lighting
- Lighting that appears to come from a source in the scene.
Practice problems
Work each problem on paper first, then reveal the answer to check.
Which light direction shows the least form?
Show answer
Front light from the camera position.
How do you make a light source softer?
Show answer
Make it larger relative to the subject, for example by moving it closer or diffusing it.
Lighting ratio with key 600 lux and fill 300 lux?
Show answer
900/300 = 3:1, about 1.6 stops.
What fill gives 4:1 with a 900 lux key?
Show answer
300 lux.
Where are the pixels of a low-key image on the histogram?
Show answer
Mostly on the left (dark) side.
Name two compositional uses of shadow.
Show answer
Simplifying backgrounds, creating lines or patterns, suggesting presence.
Why does back light help separate a subject?
Show answer
It creates a bright rim around the subject's edges.
What is golden hour light like?
Show answer
Low, warm and directional with long shadows.
What does a fill light control?
Show answer
The lighting ratio (shadow brightness).
What is a practical light?
Show answer
A light source visible in the frame.
Lesson quiz · 5 questions
Score 60% or more to complete this lesson.
Create a free account to save your progress, take quizzes and earn a certificate.